Saturday, 4 June 2016

A little Dylusional fun!

Recently I treated myself to a few Dylusions paints.  Oh my, the colours were so beautiful and after watching numerous videos on You Tube and the new Hochanda channel I was all set to paint, paint, paint.... well nearly!  In fact it took me a few days to pluck up the courage to try them.  I love colours and my favourite place in any department store or shop has always been the stationary department.  You can keep your shoes, I can walk straight past the bags, turn my nose up at the perfumes and head straight to my favourite place! And why? Because I love the colours and variety.


Well Dylusions paints hit me the same way, the colour range was wonderful and the things people could do with them were amazing! How on earth could I top these creations! 

Well I plucked up the courage to open the pots.  I learnt some great tips, these are ...

  • -Give the pot a good shake and then tap it a few times on the table.  remove the lid and work from there rather than dipping brushes or sponges into the pot itself. (great if you accidentally contaminate it.)
  • - have a mist it handy full of water.  When you have finished with your pot, give a quick spray on the paint and close it up.  Sometimes it is worth doing this before you use it (just give it a shake again after)
  • When starting out go for colours that fit well together, ones that sit on the same side of the colour wheel.  I instinctively wanted to use green and purple but don't!! try greens and blues or yellows and greens etc and start by working with three colours
  • When you finish what you are doing then dab your sponge or brush on a clean sheet of paper or journal page until the paint is all gone.  The more you get off the sponge the more use you will get from it without the need to wash it! Also you can create some great paper to use for backing sheets later on!
  • A little goes a loooooong way!
So I thought I would share with you my first video.  I am using my Crafty What Nots colour application tool kit to create a journal page.  Hope you enjoy!


My Wholesaler is now stocking the whole range of paints, that's 18 beautiful colours!  I am selling them on my website with a great discount so if you fancy some do pop by and visit.  I will be releasing more videos on how to get the most from the paints and also using some amazing other products with them such as gesso and mica!

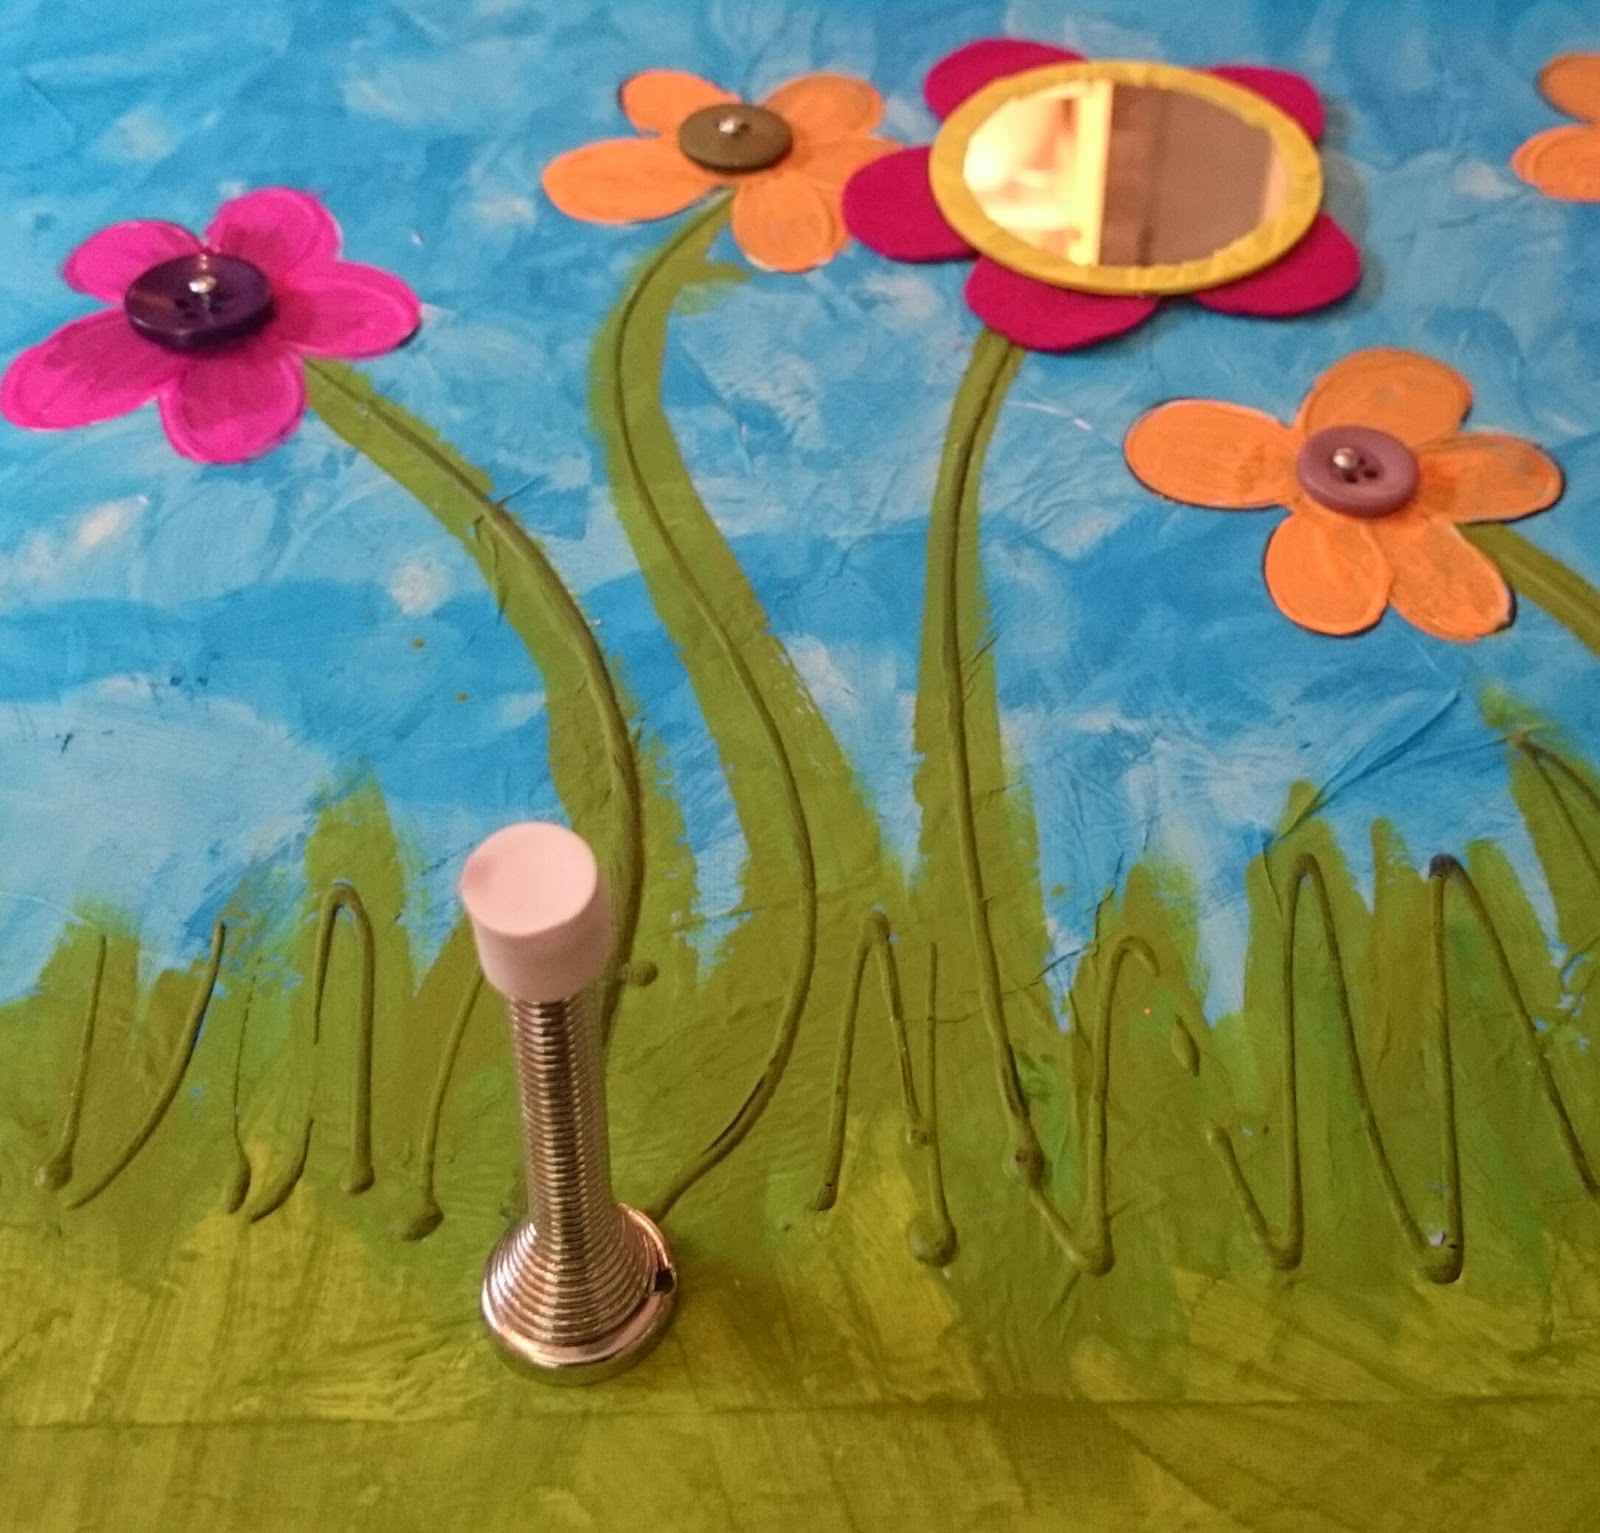
The colours really can depend on vibrancy depending on the surface you are using.  I used them to paint my door guard so they really are versatile!


Well I hope you all have a lovely week!  I will be revealing the contents of this months Crafty What Nots boxes and have a few lovely reviews to share with you.

I will be popping by Handmade Monday to share my blog so do pop by and see who is around!

Jen xx


Monday, 23 May 2016

Trying to be a good parent ~ The crafty way #3

This weekend I have been super busy getting creative! I thought I would share with you my first creation.

In order to keep Lucy in the living room I created this little barricade.  I needed it to be low enough for Emily to climb over but high enough that the baby couldn't escape and also noticeable enough so us adults, in our dazed state didn't go tripping over it!

The board lifts into place and sits in the gap where the door opens (by the hinges, this helps keep the door open as well so no squished fingers!)  the other side I fixed a scrap bit of wood to the door sill.

The first thing I did after cutting the board to size was to cover it in white tissue paper and use wide tape around all the edges.  I used a 3d glue to draw the flowers.  I was very liberal with it so that it gave it lots of texture. once dried you could feel all the petals and stems.  Very tactile!


Next I grabbed my new Dylusion paints and started to add colour. I actually quite liked it at this stage.  The tissue paper gave the background such a wonderful colour.  You can see the black lines leaving a bit of shadow here now they have been painted over.


I got busy painting the flowers, trying to keep things bold and fun.  Once I had finished with the colour I added some glossy accents to highlight some of the petals and add even more texture.


Now for the fun bit! I cut out petal shapes and glued them to one of the flowers then added a round mirror to the middle (found in the range) I went round the edge of the mirror with washi tape before gluing just to make sure the edges were as safe as possible.  I added buttons to flower middles (using nails to secure them) and added those fun (yet very noisy) door stops.  I also upcycled a pair of old jeans to create a cushioned ridge along the top.


Hey presto, all finished.  Now add children and away you go (honestly I could escape into another room!)


What have you been up to this week?  I have another couple of exciting parenting type posts lined up, one about reward charts and the other about how to make an outdoor abacus so don't forget to follow me so you don't miss out!

I will be popping by Homemade Monday as usual as well as Creative Monday so why not come and say hi!

Jenny xx 


Sunday, 15 May 2016

Embossing metal

This week I have been working on a couple of new kit boxes.  Do you remember, back in October, I posted a tutorial on how to create an embossed metal leaves? No (it was a while back, so here is the link to refresh your memory) Well it was so successful I decided to run a workshop.  We created some gorgeous metal embossed coasters! (I typically forgot to take a photo of everyone's coaster!)


I thought, as I often do, hey! I know what I'll make these into a kit!
So the latest crafty kit was born.

I still have a few stickers to create and a button for my website but otherwise they are almost ready to go! The price for this kit box is £20.  You get everything you need to create 4 beautiful coasters.  
Set includes ~ 
4 coaster blanks
4 cork backs
4 squares of two toned metal sheet
Practise metal sheet pieces
Embossing tools
Stamps
Acrylic block
Ink pad
Glue
Instructions and inspiration

metal embossing coaster kit


The Kits will be available very soon on www.craftywhatnots.com but if you wish to put your name down now and reserve one of the first boxes do let me know.
I will also be creating kits for you to use in your own workshops so please do let me know if you fancy more info.

I have been really enjoying preparing this box and renewing my love of metal work.  Here are some metal doodles I've been creating to practise my skills. (it's v addictive!)


I think I am going to be doing a lot more, I'm totally addicted!

Well I'm off to see what some other crafty bloggers have been up to.

Bye for now, maybe see you over at Handmade Monday

Jen xx


Monday, 9 May 2016

May Day - Crafty What Nots unboxing

It's that time of the month again to show you what exciting goodies were inside May's mystery box!
Here is a little video of me unboxing it (I can never get used to doing the talking on these things).  The theme (as you may have guessed) was May Day.  As always there were two crafty kits inside.  One to make a decoupaged peg board and the other to learn the basics of Iris folding. I really loved the papers in this box.  I don't normally care for the vintage theme if I'm honest but these were so great and there was so much to make with them.


This months handmade gift was a decorated ruler, mechanical pencil and a rubber.  

My problems I faced with this box were primarily glue.  I always include whatever glues or sticky items you might need and this box needed a roll of sticky tape as well as glue.  I had run out of all my little glue pots and if I'm honest they wouldn't have been big enough so I tried something new!

I sealed the end of an extra wide straw (thanks IKEA) and then filled with glue (Mod Podge is by far my fav!) ad then sealed the other end up! perfect and it is amazing how much I got in there!

The next box theme is 'My Guy' perfect for those crafting for a man in their lives, although if you don't or would rather just craft for yourself then this box is perfect as one of the tutorials is a little upcycling Jewellery kit!
Here is a little peek

sneak peek, upcycled jewellery project

Order books for June's box close on the 15th so if you fancy trying a box out (with no obligation at all) then visit www.craftywhatnots.com and click the 'buy me' tab 


I am also on the look out for promoters.  If you have a good two of either facebook, instagram, blog, twitter and would be interested in testing and promoting a box please do let me know either below or drop me an email at jenny@craftywhatnots.com.  I am happy to welcome overseas testers.

Have a fab week and do pop by Handmade Monday and Creative Monday to visit a few new blogs and read some familiar ones! 
xxx


Monday, 2 May 2016

Trying to be a Good Parent - The Crafty Way #2

I thought it was about time I show you another of my 'crafty' parenting tricks.  If you missed #1 then pop by and see my 'well done' wall here.

I don't know about you but I love lists, particularly ones that are useful and I can see at a glance!  I had this unsightly door in my kitchen that I really felt needed a makeover!

I popped to our local DIY shop and bought a tin of blackboard paint (it is cheaper online but I wanted to use it straight away and patience is not one of my strong points!) This one is actually magnetic, don't get too excited though, it only really works for really large light magnets!


I took the door off it's hinges, lay it on the table and got to covering it in gloopy black paint! If your thinking of doing this use a roller, nothing worse that brush strokes!

Once I had done a few coats and it was all dry I rehung the door (it was a very light door thankfully) and got to work with my chalk pen.

Here is the finished door.


The door has evolved over time as we have got used to it.  It started as just a to-do list and shopping list.  I added 4 circles more recently so we could show how we are feeling, it;s a good way for my middle one to explain her emotions.  (she drew daddy's emotion yesterday, he has three noses or rather to be exact two nostrils and a nose!)

We are also doing a parenting course (as I know I mentioned before) and one thing we had to do was devise some house rules.  This actually resulted in many arguments so in the end we settled with the simple 'We take care of people and things'.
The lowest section is a picture frame for the kids to draw in. (it's the most accessible area for them)
I am sure it will be filled with works of chalking genius in no time.

The thing I love most about this board is shopping list.  I know I can't take it with me, I don't have a big enough bag! All I do is take a photo of the shopping part of the door and hey presto I have my list to go without wasting paper!  The shopping list is always kept up to date as we add to it whenever things are out or low.

A word on chalks! I used this chalk pen from Dovecraft to do all the things that I wanted to remain relatively permanent.  It is so smooth to write with and you can easily wipe over to remove normal chalk marks without this being rubbed away!  I have a bowl of normal chalks near the board so we can always add the to board and rub away as needed.


I actually have a few of these pens in stock as my wholesaler requires minimum ordering so if you are interested in one you can buy one here.  The price is reduced down to £2 but I only have 5 left.

I am desperate to for other things to cover in blackboard paint now! 

I am off to share my blog over at Handmade Monday and Creative Mondays, do feel free to pop over and see a few great blogs!

Jenny xxx


Monday, 25 April 2016

Pen Storage

To say this has been a big bug bear for some time is a bit of an understatement.  I have been on a constant quest to find the perfect storage for my pens ever since I had too many to fit in my pen roll! Now, as you may well know, alchol pens really need to be stored on their side.  This is mainly so that one end (mine are all double ended) doesn't fill with the ink and the other dry out. My main problem has been that storing pens on their side is frustrating.  they are harder to identify and storage for them is a nightmare!
The first thing I did (as so many do I expect) is search Pinterest for storage.  Now I know that you can buy custom made storage but aren't they expensive!!!  I discovered a great idea using a DVD rack.  I searched high and low for a rack that would work but to no avail.  My next idea was to create a similar effect using lots of dvd cases and copious amounts of glue and washi tape.  This worked to an extent but I could only house some of my pens this way and it was very labour intensive to create just one box so many was a daunting job!
My latest breakthrough came when a wandering through the Range (a pastime of mine! lol) I found these lovely boxes made by Curver.  The thing that attracted me to them were the holes in the sides and also that the sides were square.  many boxes have sloping edges which makes things much harder!

I discovered that I could Fit 2 wooden skewers into the holes.  I measured the width of the pens and pushed through two skewers at even intervals up the front edge of the box.  I then pushed through one skewer at the same level but further into the box so the pens would have something to rest on.


I used wire cutters to cut all the skewers flush with the side of the box and then used a glue gun to secure all the ends in place.


I discovered that if you make a mistake with the glue gun and wish you had put a skewer somewhere else then just heat it over with a heat gun and it melts enough to move it.

Once cooled I then started to fill with pens!

My earlier attempts at this storage included created a twine lattice grid behind the front skewers, this did stop pens going side to side but it also meant that the pens bounced a bit inside.

You can also see that I washi taped the front sticks together to add a bit of decor on this one.  My aim was to use white stickers to cover the two rods and then colour them in with the pen colour above them.


Well here is my colourful corner! Fab pens and beautiful paints. 


Well for now I love it!  I may find an even better way to store my pens but until then... yeah!

Do you have the same problem?

I will be linking up on Handmade Monday so do pop by and check out some great blogs!

xxx


Sunday, 17 April 2016

April Showers

Did you guys know it was April?  I mean seriously where did March go!  What's worse is that it is the middle of April and I have get to post!

I have released 4 new boxes and of course there is the very exciting unboxing of April's colourful box.

I realised last month that sometimes it is hard to know what essential tools you might need if you are starting out with crafting or in a particular area of crafting.  This pondering inspired the 4 latest boxes  'The Basics essentials' collection.

beginners crafty tool kit

colour application tool kit, great for crafting beginners

starter heat embossing kit


beginners kit for craft stampers

These are all available on my website.  I am also happy to sell all items separately if you are after anything in particular!

I have started doing videos for the boxes to give people an idea of how to use them.  I know some are quite self explanatory but every little helps doesn't it!
Here is a video I created with my lovely crafty friend Jane.  How to heat emboss.


Have you tried heat embossing before?

My trouble is I keep thinking of extra things I could put in each box but I have to keep reminding myself these are the basics, I could always bring out an extension kit!  What sort of kit would you like to see? 

April also saw the release of the monthly box.  This months theme was April Showers.  I've done another little unboxing video again for you guys to see what was inside.


Well I think I may have overloaded you so I will leave it at that for now.  I have so many things to show you including another parenting the crafty way and also an update on my quest to find the perfect storage for my marker pens!


I will be popping by to share my posts this week at Handmade Monday so do pop by and link up your blog if you have one or just come and see what other bloggers have been up to!

See you soon!