
Where has this weekend gone??? I have had quite the busy week planning pretty crafts for the latest Crafty What Nots box, With a love theme I am having terrible trouble narrowing down the options to include! Oh the choices!!!!
I thought it was about time I popped another tutorial your way! Here is a little one on how to make a beaded bracelet. I love the simplicity (it is easy!!! honest!)

Beaded Macramé
bracelet
You will need a
pencil, 2m length of cord and a selection of beads with big enough holes for the cord to pass through.
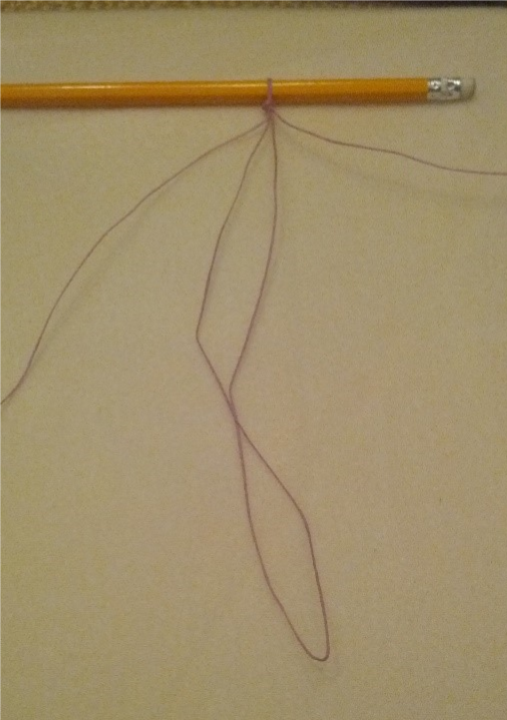
Step 1 – Fold your cord in half and measure 30cm from the fold. Create a loop and knot so you can just fit a pencil through the loop. Lay the threads so that the fold is pointing towards you and the two long ends lay either side of the shorter one.

Step 2 – thread a bead onto the short ends which are still joined at the end. (always keep this length pointing towards you).

Step 3 – take the left thread, pass it under the middle threads and over the right thread.

Step 4 – now take
the right thread, pass it over the middle threads and post it through the left
hand loop so that it travels under the left thread. This is the basic knot we
will use throughout.

Step 5 – gently pull both threads evenly, they should create
a knot which surrounds your first bead.

Step 6 – Using the
same techniques create another knot, this time without a bead. Do this 5 times to create a short knot
length.

Step 7 – add another bead like you did in step 2 and then
repeat steps 3-5. Now knot 5 more knots
without beads. Alternate beads and knots
until your bracelet is long enough to go around your wrist.

Step 8 – once the length is long enough, tie a knot after
the last bead using all 4 threads.
Carefully cut away the short folded thread up to the knot (Your knot
should keep your threads in place, however if you wish to add a little dab of
nail varnish or glue to the knot is will help secure it further.

This last bead is your catch! Post it through the loop you made in step 1
and hey presto! All ready to wear!
Well I will be popping off to link up with Handmade Harbour and see what other lovely bloggers have been up to! I am also linking up to

Have a creative time xxx
Great tutorial! My nieces loved their Christmas crafty what not boxes and one had made the blue bead bracelet before we finished opening all the other presents! Thanks so much for compiling them, I can recommend them as presents!!
ReplyDeleteOooo, I'm so thrilled they liked them! They were a wonderful pre-Christmas distraction so thank you so much for thinking of me. I am in the throws of planning more one off boxes now! Will keep you posted xxxx
DeleteA great easy to follow tutorial. I used to love doing macrame, I've still got the owl I made in the late seventies! Xx
ReplyDeleteIt is one of those crafts that just keeps coming round isn't it! I love the fact you can create so much and all with knots! I hear it is making a huge comeback again!!! I think I may need to learn a few other knots! lol xx
DeleteI love how easy you make this look, definitely pinning so I can give it a try later. Thanks
ReplyDeleteThank you honey. It was a tutorial from one of my Christmas one off Crafty What Nots boxes! xx
DeleteThank you so much for posting such a great tutorial. This will be fun to make and see the finished result. Wishing you a wonderful week.
ReplyDeleteThank you so much. Hope you have a wonderful week too xx
DeleteThis is soooo cute, thanks for the tutorial! x
ReplyDeleteMy pleasure. So glad you like. Xxx
DeleteThese are very similar to breaclets I have crocheted before, but a little different look. Great job with the tutorial.
ReplyDeleteThey are so easy aren't they and so many variations. I have made one's with only a couple of beads in the middle and nearly all knots. You just have to remember to adjust the cord lengths. Xx
DeleteA cute bracelet and great tutorial.
ReplyDeleteThanks for sharing. I need to look up what your what not boxes are
Thank you so much. There is a link to crafty what nots at the top of the post. There are lots of lovely reviews and pictures of past boxes as well as buying options of you would like to try one for yourself. Deadline for February boxes is 15th Jan xx
DeleteA lovely clear tutorial and a really pretty bracelet. :)
ReplyDeleteJan x
Thank you xx
ReplyDelete