Showing posts with label bracelet. Show all posts

Monday, 19 January 2015

Button Charm Bracelet Tutorial

This week I thought I would show you how to make this really cute button bracelet! I love buttons and have seen all sorts of similar bracelets so thought I would give it a go and make my own!


Button Charm Bracelet

You will need ~ Length of chain that will go around your wrist (only just). A selection of buttons (I used around 24) You need to make sure the buttons aren't too big or that the hole is too far away from the edge.  Enough large jump rings for each button plus two spare. A claw clasp (or something of your choosing). Pair of pliers.


Step 1 ~ Take a jump ring and using the pliers twist it open.  DO NOT pull the ring apart, the secret is to twist it then it will close better.


Step 2 ~ Add a button and then hook the chain into the same jump ring.


Step 3 ~ Close the jump ring by twisting it shut.  You have now added your first button charm to your bracelet.


Step 4 ~ Keep adding button charms to your length of chain until you have the desired amount.  You could be far more creative with the colours than me and add different shaped buttons and beads if you wish to add variety!

Step 5 ~ Take a jump ring and add to one end, this will be where the clasp catches.


Step 6 ~ Now take another jump ring and attach the claw clasp to the other end in the same way that you attached the buttons.


Now all that's left to do is put it on and wear with pride!


I thought these might look great layered!  I could create lots of button charm bracelets in different shades and wear several at the same time to compliment what I'm wearing!

In other news...I have set up a new website for my Crafty What Nots postal mystery craft boxes! I am still finalising the payment page but it is all up to date with images and reviews as well as crafty questions.  www.craftywhatnots.com.  I can also be found on facebook www.facebook.com/craftywhatnotsbox.  I thought this month I would post a mini spoiler for the next box! Do you think it would add to the excitement?  Here it is...can you guess what they are going to be?


Well I thought I would leave you with a lovely view!  Yesterday we had a really wonderful walk on a beach we haven't visited before (not sure of it's name but it is in Weymouth Bay)
  

Wasn't nice to have some sun! 

I'm off now to link up with the fab Handmade harbour and Creative Mondays!  

Have a great week xx


Sunday, 11 January 2015

Macramé Beaded Bracelet Tutorial

Where has this weekend gone??? I have had quite the busy week planning pretty crafts for the latest Crafty What Nots box, With a love theme I am having terrible trouble narrowing down the options to include! Oh the choices!!!! 

I thought it was about time I popped another tutorial your way!  Here is a little one on how to make a beaded bracelet.  I love the simplicity (it is easy!!! honest!)

beaded-macramé-bracelet-tutorial

Beaded Macramé bracelet
You will need a pencil, 2m length of cord and a selection of beads with big enough holes for the cord to pass through.


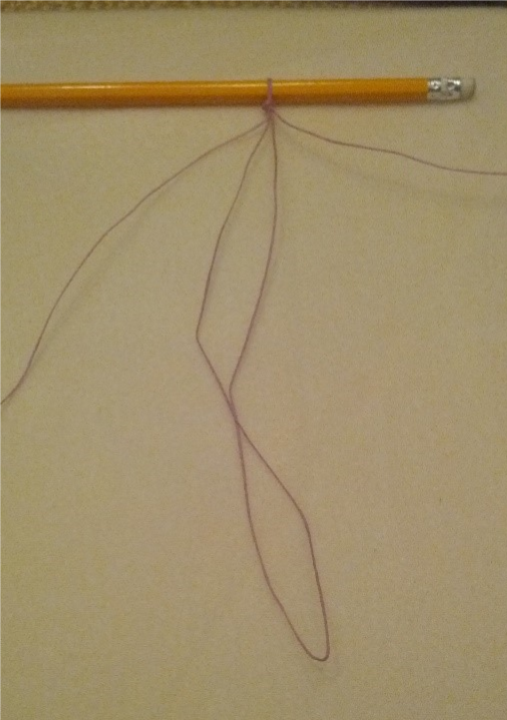
Step 1 – Fold your cord in half and measure 30cm from the fold.  Create a loop and knot so you can just fit a pencil through the loop. Lay the threads so that the fold is pointing towards you and the two long ends lay either side of the shorter one.


Step 2 – thread a bead onto the short ends which are still joined at the end. (always keep this length pointing towards you).
  

Step 3 – take the left thread, pass it under the middle threads and over the right thread.

  
Step 4 – now take the right thread, pass it over the middle threads and post it through the left hand loop so that it travels under the left thread. This is the basic knot we will use throughout.


Step 5 – gently pull both threads evenly, they should create a knot which surrounds your first bead.


Step 6 – Using the same techniques create another knot, this time without a bead.  Do this 5 times to create a short knot length.
  

Step 7 – add another bead like you did in step 2 and then repeat steps 3-5.   Now knot 5 more knots without beads.  Alternate beads and knots until your bracelet is long enough to go around your wrist.


Step 8 – once the length is long enough, tie a knot after the last bead using all 4 threads.  Carefully cut away the short folded thread up to the knot (Your knot should keep your threads in place, however if you wish to add a little dab of nail varnish or glue to the knot is will help secure it further.


 Step 9 – Lastly thread a bead onto the last long threads, let it sit around 1cm down and then knot the thread a couple of times so that the bead won’t fall off.  Add a dab of glue or nail varnish to stop the thread unravelling. 


This last bead is your catch!  Post it through the loop you made in step 1 and hey presto!  All ready to wear!

Well I will be popping off to link up with Handmade Harbour and see what other lovely bloggers have been up to!  I am also linking up to

Have a creative time xxx

Thursday, 7 August 2014

Shrinky Plastic Bracelet Tutorial

Crafty recycled workshop
Today I had the privilege of working with one of my WI groups again.  Today's workshop was to create a charm bookmark or bracelet.

Here is the result of my demo tutorial i gave to my very lovely friend Janey (she is so fab!  I even had to talk to her like I was presenting to a large group! needless to say there was a lot of giggling!)  Anyhow, mine is on the right and hers on the left!  They are just so pretty.  

Well to break it down here is what we made.
1 - charm from cereal boxes and paper offcuts
1 - flower made from plastic bottles
2 - charms made from old envelopes
2 - charms made from shrinkable plastic
several charms made from upcycled beads.

After constructing our various charms and heating where necessary we assembled them on a short length of chain with large jump rings.  I love the colours of these, I have always disliked orange terrible but I have quite a liking for it now!

Here are some of the lovely creations the WI ladies made today.  Unfortunatly I only remember to take a couple of pics so there are no images for the lovely bracelets.


 I thought I would share a quick tutorial with you, not to make these bookmarks (all these techniques would take a while) but just to make the shrinkable ones!  I will no doubt do tutorials for the others at some point!

Shrinky bracelet


To make this bracelet I used - Artist grade shrink plastic, permanent markers, Stazon ink, clear stamps and acrylic block and a heat gun.

In the interest of recycling you can use plastic container and bottles, however the only ones that will shrink are plastics with a 6 on them.  Also always work in a well ventilated room when heating plastics.

Step 1 - I cut some 2x2.5" rectangles and punched holes in the short ends using a hole punch.  I also used a corner punch to round my corners so that it wasn't all sharp once heated.


Step 2 - colour your squares with permanent marker.  I only coloured one side as the other will be against my wrist.


Step 3 - Now for some highly ridiculous reason I forgot to take a picture of this bit.  But you will need to stamp your stamps on each piece.  I used two different sets for mine.  Remember your designs will shrink down 45% so bigger designs usually look good.  You are best using a permanent ink here, I used Stazon.

Step 4 - As I had so many pieces I put mine in the oven on 200`c and watched them like a hawk until they finished shrinking and were lying flat, however if you want to you can use a heat gun (not a hair dryer or paint stripper)


Here they are!  I discovered that using the lightest colours I could produced the best results, this is because as the plastic shrinks the colours intensify and darken.  If you start out with a dark colour you can't see your stamping so well.

Step 5 - using large jump rings I attached the sections together.  As you can see above I did more pieces than I needed, however this meant I could choose the best for my bracelet and I learnt about the colour differences so win win!


So here is the finished piece.  I popped a claw clasp at one end and joined the rings on the other end together with another jump ring.

As always do pop by my shop on the link below if you would like to see exactly what I used for this tutorial.


Look forward to hearing any of your shrinky plastic news or makes xx