Monday, 31 August 2015

Quick Crafty Card tutorial

Good morning to you all!  How have you been surviving the school holidays? I have certainly found three children quite the handful, especially as my middle one is still trying to adapt to having a baby sister taking up so much of my time!!

I thought I would share a little summery tutorial with you today.  Have a go at making this cute and super easy card!


Step 1 - You can use any shape card, I have chosen a square one here.  First thing you need to do is place a strip of double sided tape approximately 1.5" in from the right side (making sure that your card opens up to the right side).


Step 2 - start to stick your flower embellishments along the strip.  You need to ensure that the side of the flowers go close to the edge but not go over it (mine here is a little close!), the top ones can go over the edge top and bottom.  


Step 3 - Make sure all the tape is covered (you can always add a little more tape and layer your flowers if you wish)


Step 4 - cut around the edge of your flowers, leaving a little border of white around the edge.


Why not add some ribbon or sentiment to finish off your card!!


In the wonderful world of Crafty What Nots I have just launched the 'Crafty Night Before Christmas box'  A Christmas eve box with a twist.  Just like the normal monthly boxes this one-off box is full of crafty goodies, tutorials and a special handmade gift.

Each box is sent out on the 1st December and is available in 4 age ranges - under 5, 5+, teenager and adult!!

So if you fancy starting a new tradition or after an unusual Christmas present for a loved one (or yourself!!)  Do pop buy and find out more!  I am also happy to ship internationally so if you would like a box but not in the UK don't fret (the postage is increased however as you can imagine!)


I am so excited about these boxes and been planning like made!!!

In other news I have been picking up the old pencil again and been making family portraits for some lovely people.  Here is the first one I did.  I am currently running an offer on these. 25% off the first five paid orders I have (there are only two slots left!!)


Well I am going to link up with Handmade Monday (something I haven't been able to do in ages!)
Have a lovely week folks xx

Monday, 10 August 2015

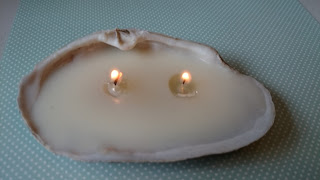
Shell Candles tutorial

Happy Monday one and all!

I know, I know... I havn't been around for a while.  Life has be quite chaotic especially after the birth of my latest little one!

I thought I would share a tutorial with you which didn't make it into the last Crafty What Nots box (I just couldn't find enough shells!)

Shell candles
You will need ~ 1 large shell which will sit solidly on a flat surface (you don't want your candle to rock or fall over!!) 2 or more night lights depending on the size of your shell, oven.


Step 1 - take the wax part of your night light out of it's case (make sure it is one with a metal case!)


Step 2 - carefully pull the wick out of the candle from the base.


NOTE - my wick actually came out of the metal base, if this happens to you then you need to enlarge the hole where it attaches and pop it back in.  


I used a cocktail stick to make mine bigger.


Once you have removed your wicks place them in your shell.  I thought that this shell would need two candles hence why there are two wicks. If your shell is particularly deep it may be worth putting them in shallower areas or resting them on wax to raise them up. 


Pop your wax back in their metal containers and place on a baking tray in the oven.  I put the heat up to 220`C and watched it until it had melted. You could place on a tray on a gas hob or use a heat gun if you'd rather (beware that the wax doesn't spray with the pressure of the heat if you use the latter)


Step 5 - carefully and with a towel or pliers pour the wax into your shell.  I was worried that the wax would make the wicks float but they didn't thankfully!


Here is the difference between using 1 and 2 candles!


Step 6 - Now let it cool on a flat surface.  Now you can pop it in a safe place and light!


I can imagine these would look lovely around the bath!  Do remember tho... be safe!  Never leave them unattended!

I have been having a bit of a sort out in the craft room and collected all the Christmas stock I have.  I have updated the website and reduced all the Christmas prices so if you are after some lovely papers do pop by and see what's available.


http://jennysis.com/?product_cat=christmas
There are limited stocks although if you are after more I am still able to get some lines!