Showing posts with label journal. Show all posts

Tuesday, 6 June 2017

Introducing Jendoris

Sometimes I am very surprised at the directions my craftyness takes me.  I have been really getting into planning this year and I currently have 3 different planners, healthy eating, business and everyday.  My everyday has been particularly fun and has led to my latest product!  Jendori!


So what is a Jendori?  Well it's my personal take on the Travelers Notebook system.  I'm not sure that answered the question right?  

A travelers notebook, or in my case the Jendori is basically a cover with elastics inside.  You can then add whatever inserts you wish to fill it up.  


So what's so different about mine?  Well each of my Jendoris are A6, fabric, trifold and quilted in my own swirly pattern.  I also make inserts and can customise them to the colour scheme of the cover!
Each Jendori comes will added elastics and a metal charm. 

There are so many fun fabrics to choose from. Here are just a few that have been made and sent out to their new forever homes recently.


I have created all sorts of inserts so far.  These have included address books, diaries, habit trackers, plain and squared inserts and also bill trackers.  So if you fancy having your own, unique Jendori then pop by my Facebook page or pop me a message.  I will have everything listed on the website soon but it is currently being redone and it's taking me a while to add everything.

I will leave you with a video unveiling on one of my recent orders.  


I will be popping my Handmade Monday to have a browse to do pop by to say hi and meet some wonderful crafters!

Saturday, 4 June 2016

A little Dylusional fun!

Recently I treated myself to a few Dylusions paints.  Oh my, the colours were so beautiful and after watching numerous videos on You Tube and the new Hochanda channel I was all set to paint, paint, paint.... well nearly!  In fact it took me a few days to pluck up the courage to try them.  I love colours and my favourite place in any department store or shop has always been the stationary department.  You can keep your shoes, I can walk straight past the bags, turn my nose up at the perfumes and head straight to my favourite place! And why? Because I love the colours and variety.


Well Dylusions paints hit me the same way, the colour range was wonderful and the things people could do with them were amazing! How on earth could I top these creations! 

Well I plucked up the courage to open the pots.  I learnt some great tips, these are ...

  • -Give the pot a good shake and then tap it a few times on the table.  remove the lid and work from there rather than dipping brushes or sponges into the pot itself. (great if you accidentally contaminate it.)
  • - have a mist it handy full of water.  When you have finished with your pot, give a quick spray on the paint and close it up.  Sometimes it is worth doing this before you use it (just give it a shake again after)
  • When starting out go for colours that fit well together, ones that sit on the same side of the colour wheel.  I instinctively wanted to use green and purple but don't!! try greens and blues or yellows and greens etc and start by working with three colours
  • When you finish what you are doing then dab your sponge or brush on a clean sheet of paper or journal page until the paint is all gone.  The more you get off the sponge the more use you will get from it without the need to wash it! Also you can create some great paper to use for backing sheets later on!
  • A little goes a loooooong way!
So I thought I would share with you my first video.  I am using my Crafty What Nots colour application tool kit to create a journal page.  Hope you enjoy!


My Wholesaler is now stocking the whole range of paints, that's 18 beautiful colours!  I am selling them on my website with a great discount so if you fancy some do pop by and visit.  I will be releasing more videos on how to get the most from the paints and also using some amazing other products with them such as gesso and mica!

The colours really can depend on vibrancy depending on the surface you are using.  I used them to paint my door guard so they really are versatile!


Well I hope you all have a lovely week!  I will be revealing the contents of this months Crafty What Nots boxes and have a few lovely reviews to share with you.

I will be popping by Handmade Monday to share my blog so do pop by and see who is around!

Jen xx


Saturday, 6 September 2014

Once upon a story stone - teachers packs

Well the last few weeks have been slightly crazy! I have been finishing off an order for 3 teacher sets of story stones, that's 90 pebbles, 180 images, 3 instruction booklets and 15 bags!

Here is one of the sets, all labelled and ready to go!


I am thrilled with the results but it has been quite the task!  I usually sew my own drawstring bags from fabric scraps but the thought of doing 15 was...well...very stressful! I decided to buy in some plain bags and then dye them myself.  Have you tried using the handwash dylon dyes???? Little tip...when they say wear gloves...do! and wear them all the time!  I had multi coloured hands as I only wore mine for parts of the process.  After creating my bags I ironed on my logo and the class names so the bags didn't get all muddled.


I draw each image myself, then colour and cut out before attaching to each pebble.  It has take some time to get to this technique with many a failed pebble to prove it!  I even tried stream lining the production by scanning completed images and printing off copies but they never looked as good.

Anyhow, after great lengths they are finally done and ready to go to their new homes.

I have found these school holidays to have been soooooo long!  It has been quite the juggling act to manage kids, work and crafting but I think I may have made it...just...and with a few grey hairs too I expect!  Here are a few of my recent makes.


As always I will be popping round to Handmade harbour for a peek  at some wonderful blogs!

xxx


I am also popping round to sewlicioushomedecor.

Tuesday, 5 August 2014

Mini Album 1 - tutorial

Mini Album ~ 1

I thought I would take some time out in my busy preparation for my next workshop to share another tutorial!  I love this little book and I have used it in scrapbooks, as brag books and even as sentimental cards.  It is very simple to make, using very few materials and demonstrating how not a lot can make something wonderful.


To start, you will need 1 sheet of double sided 12x12" paper (or 4 6x6" sheets)  I also used up a few scraps in coordinating colours.  You will also need a bone folder (I use lollypop sticks) Double sided tape or glue (I use both to be extra safe!) length of ribbon to wrap around your final book, pens and photos and embellishments (I use punches to create mine so that they always match my work)


Step 1 - You will need to cut up your 12x12" sheet into 4 6x6" (I know what your thinking.... why did I bother saying 12x12"? well I like to save paper where I can and I love the idea of creating this from one sheet! )


step 2 - take one of your squares and fold in half widthways and then lengthways.  Now fold it diagonally (but only one way)  Now make sure all folds are well folded (use bone folder or lolly stick for this)  It is also a good idea to fold each fold in both directions as it will help with folding later on.


Repeat with another 2 sheets so you have 3 in all.


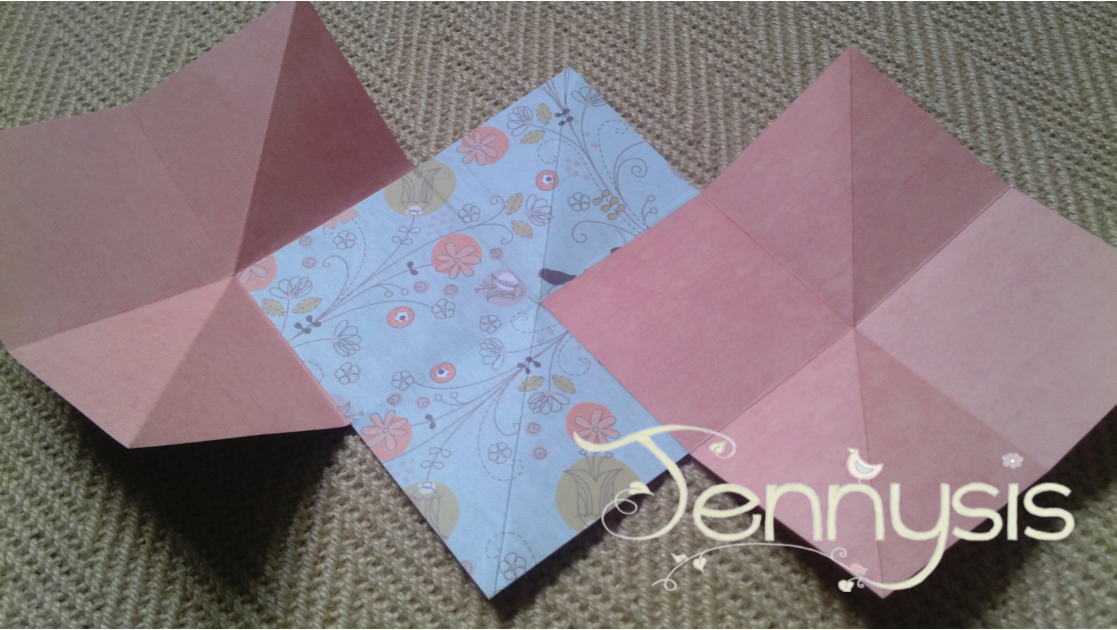
Step 3 - You will need to fold up each sheet so that they look like this.  (very hard to explain so I am hoping the picture tells all!)  I have made sure that the pattern is on the inside of one and the outside of two.  You can experiment with this and if you used all different papers then that's even more to play with!.


Step 4 - Place double sided tape in the bottom right square of one of your sheets.  I also put a few dabs of glue on my tape for added strength.


Step 5 - Now stick the top  left square of a new sheet over the top of the bottom right square you just taped.  As you can see I have turned my paper around so that the pattern is showing on my second sheet.


Step 6 - Repeat the last two steps and fix the last sheet in place.  You could always add more squares here if you wish or even just stick to 1.  I do suggest however that you work in odd numbers as it looks far neater when closed.


Step 7 - I have just folded up my album so far.  It takes a little practise but you are aiming for the pages to all flatten into a small 3x3" square.


Step 8 - Turn your book over so that the bottom is on the top. (until you decorate this doesn't necessarily matter but you may have one side you like more than the other)  You need to stick your ribbon in the center of the back panel like shown.  I used tape and glue!


Step 9 - Cut a 2.5x2.5" square and stick it over the ribbon to tidy it up and cover the glue.  ( I rounded my corners....Just because!)


Step 10 - Now get creative!!!  make sure your ribbon is to the right of you, start at the left and have fun!  I put pictures on the flat squares and on the mountain folds I placed large flowers (if you do this only stick half of the flower so that it can still fold.)  You can always put more pics on the folds.  DO NOT put anything on the valley folds, your book won't fold if the valley folds are covered.


Here is my book all folded (you may notice that the ribbon isn't in this picture, I actually put mine on last but decided that it would have been better to do it earlier!)


Step 11 - Pop a tag or scrap of paper on the front with a title so you know what is in side it!


Tie up your ribbon and Ta Dah!!! 

Other variations on keeping your book together could include elastic popped over the top going down the back and then popping over the bottom.  I have even used magnets in the past.  I would love to see what you create from this!

As always here is the supplies button to take you to my website so you can see the materials I used.


Hope it goes well
Off to dip my toes at the Handmade harbour, do pop over and say hi!


xx


Tuesday, 15 July 2014

Washi paperclips tutorial


It occurred to me, while sorting out my craft room (an almighty job!) that I ought to be able to do something constructive with a box of paperclips I have.  I love scrapbooking, in particular journalling.  I have a few fancy shaped paper clips holding mementos and photos all ready but wondered if I could do my own.  Here is my mini tutorial for jazzing up paper clips!

Washi Paperclips

 First take a paperclip and  a length of tape, I tore off around 8cm, the ends don't actually matter at this stage so you don't need to be too neat!  This tape is just less than 1cm wide.


Next step I threaded the tape through the loop (like above) and pushed the ends together making sure all the sticky side was covered.  I then cut the end into a chevron to make it look like a ribbon.


Here I had a go with a wider tape, it was a bit fiddly but looked great in the end!


Here are my new washi tape paperclips in one of my 'And Etc's' journal.


I think I am going to have to make a lot of these using all my different tapes!!  If you would like to see the tape I used as well as other washi tapes I stock please click on the link below!


xx


Tuesday, 27 May 2014

Smash book tutorial

Well after all the excitement with my last post I really didn't know what to write today.  I decided to give you more of a sneaky peak at my smash book.  The book itself is 7" x 6"  which is lovely size, usually I create books a little bigger but due to the constraints of the 8x8" paper size I had chosen I had to compromise.

Smash Book


I firstly started off by cutting all my pages to the size I wanted.  All but 2 of these sheets are double sided, this saves on paper ultimately so you don't need to double your paper in order to make them double sided.
I saved all the offcuts from my paper, I used these later on to decorate my book.


On the two pieces that were single sided I cut a semi circle in the top.  I then attached double sided tape down the two sides and along the bottom and stuck each one to another sheet of paper.  This makes a pocket and the semi circle helps you to pull out a tab or whatever you have decided to put in there.


I cut out various sized shaped from 1 sheet of cream card, these will be used to journal later on or to stick photos to.


Here are all my pages decorated!  I had put journalling squares on most of the pages and a couple of narrow strips and then jazzed them up with some beautiful flowers.


Next I created my front and back covers, These were made by cutting some thick card a little larger than my paper and then covering them with paper.  I then added a journal square and some flowers!


Lastly I put them all in the order I wanted and ran them through my 'Bind it all', You could just punch your own holes in and thread through them or put in rings.


All I need to do now is fill it with wonderful memories!

xx