Showing posts with label greetings card. Show all posts

Wednesday, 17 February 2016

Getting ready for a new workshop!

I have been preparing for my first proper craftea afternoon workshop since having Lucy.  We are going to be creating spinner cards! Have you made them before?  These clever little cards require 2 pennies, round foam pads and a little creativity!  It'll be interesting to see how it goes!


This one is going to be great for those who don't like to cut!  it can be done with punches.  I just love the way the alien spins around in a circle. (sorry no video of these in motion I'm afraid) 


Cupcakes and candies


Flying high (looks less of a plane crash when you move it by hand... not sure I thought that one through!)

Have you made spinner cards before?  I will get round to a tutorial at some point.

Jen xx

I'm linking this up to handmade harbour, do pop by to say hi. 


Tuesday, 12 January 2016

The heart secret note tutorial

Just popping by with this new little tutorial for you.  I love things which are a bit different and this little card was no exception!


 I love the way the hearts close the card.  Why not have a practise ready for valentines day!


I'm going to link up with Handmade Monday 

Jen xx

Monday, 31 August 2015

Quick Crafty Card tutorial

Good morning to you all!  How have you been surviving the school holidays? I have certainly found three children quite the handful, especially as my middle one is still trying to adapt to having a baby sister taking up so much of my time!!

I thought I would share a little summery tutorial with you today.  Have a go at making this cute and super easy card!


Step 1 - You can use any shape card, I have chosen a square one here.  First thing you need to do is place a strip of double sided tape approximately 1.5" in from the right side (making sure that your card opens up to the right side).


Step 2 - start to stick your flower embellishments along the strip.  You need to ensure that the side of the flowers go close to the edge but not go over it (mine here is a little close!), the top ones can go over the edge top and bottom.  


Step 3 - Make sure all the tape is covered (you can always add a little more tape and layer your flowers if you wish)


Step 4 - cut around the edge of your flowers, leaving a little border of white around the edge.


Why not add some ribbon or sentiment to finish off your card!!


In the wonderful world of Crafty What Nots I have just launched the 'Crafty Night Before Christmas box'  A Christmas eve box with a twist.  Just like the normal monthly boxes this one-off box is full of crafty goodies, tutorials and a special handmade gift.

Each box is sent out on the 1st December and is available in 4 age ranges - under 5, 5+, teenager and adult!!

So if you fancy starting a new tradition or after an unusual Christmas present for a loved one (or yourself!!)  Do pop buy and find out more!  I am also happy to ship internationally so if you would like a box but not in the UK don't fret (the postage is increased however as you can imagine!)


I am so excited about these boxes and been planning like made!!!

In other news I have been picking up the old pencil again and been making family portraits for some lovely people.  Here is the first one I did.  I am currently running an offer on these. 25% off the first five paid orders I have (there are only two slots left!!)


Well I am going to link up with Handmade Monday (something I haven't been able to do in ages!)
Have a lovely week folks xx

Tuesday, 9 June 2015

Pin wheel spinning card tutorial

Well it has certainly been a while since I last blogged.  I haven't forgotten you all, honest, Just been a bit busy getting things sorted before the baby arrives.

Anyhow I thought I would share a quick tutorial with you ready for fathers day.

The Pin wheel spinning card.

You will need a pin wheel template, card blank, papers and card for layering, round foam pads (easily found in the range at the mo) Scissors and round punches.


Step 1 - I started with a 4" square card and layered some fab balloons on top (cutting it 3.5x3.5") These balloons are from the wonderful Man Made papers range and were included in June's Crafty What Nots box.  Each balloon is embossed which is rather lovely too!


Step 2 - I next layered a 3x3" grey square of card onto of the balloons to add contrast later on and hide the mechanisms.


Step 3 - cut out a strip of card 1x2" and using a 3/4" circle punch create a hole in the centre.  You also need to punch out a larger circle, This one is 1".


Step 4 - Place a round foam pad in the centre of your bigger circle.


Step 5 - layer the card strip over the circle with the foam dot so that the foam circle shows through the hole.


Step 5 - stick your Pin wheel onto the centre of your foam circle.


Step 6  - turn your piece over and attach foam pads, make sure they do not stick to the circle (infact keep them as far away as possible!) If the pads are too close your wheel won't spin.


Step 7 - now attach your pin wheel to the centre of your card.


Step 8 - I then doodled some writing around the edge to add a little something!  How about writing Happy Fathers Day?


Here is the little spinning card in action!

If you want to know how to make a pin wheel then you will need to start with a square and cut diagonally in from each corner towards the centre, stop short of reaching the centre by about a cm.  then fold down one side of each triangle and pin in place.  This pin wheel started out as a 3" square.


June's Crafty What Nots box was the lovely 'On the Go', great for fathers day.  These pin wheels were included in the box and the card I made as a personal card to each of my subscribers.  Here is a collage of some of the treasures included in the box

Tutorials this month were to make Shrinky plastic embellishments and necklaces, pin wheels and also a secret origami note.  The free gift was a hand made charm bracelet.

Don't forget to pop by www.craftywhatnots.com for more information on Crafty What Nots as well as inspiration and offers.

xxx


Wednesday, 15 October 2014

Exploding box card tutorial

I thought I would share a new tutorial with you, I am doing this as a workshop on Friday and figured this would be a good opportunity to share it with you all.

Exploding pop-up card


Step 1 - For this tutorial I started with a 12x12" sheet of double sided scrapbook paper.  I firstly cut down my sheet to 29x15cm.  I put the rest to one side ready for later on.  Next you need to mark out 4 lines 7cm apart, this will leave a 1cm strip at the end.  (I have used pen here so you can see, I suggest that you just score the lines as you will need to score them anyway.  If you need lines maybe use a pencil)


Step 2 - Fold along each of the lines you drew in step 1.


Step 3 - mark 15cm down the vertical edges.  Join these marks up although do not score through the section closest to the 1cm strip.  (see image above)


Step 4 - Cut down each of the 4 vertical lines down as far as the middle line your scored in the last step.  You can also cut out the top section of the narrow strip all together (this will be your tab)


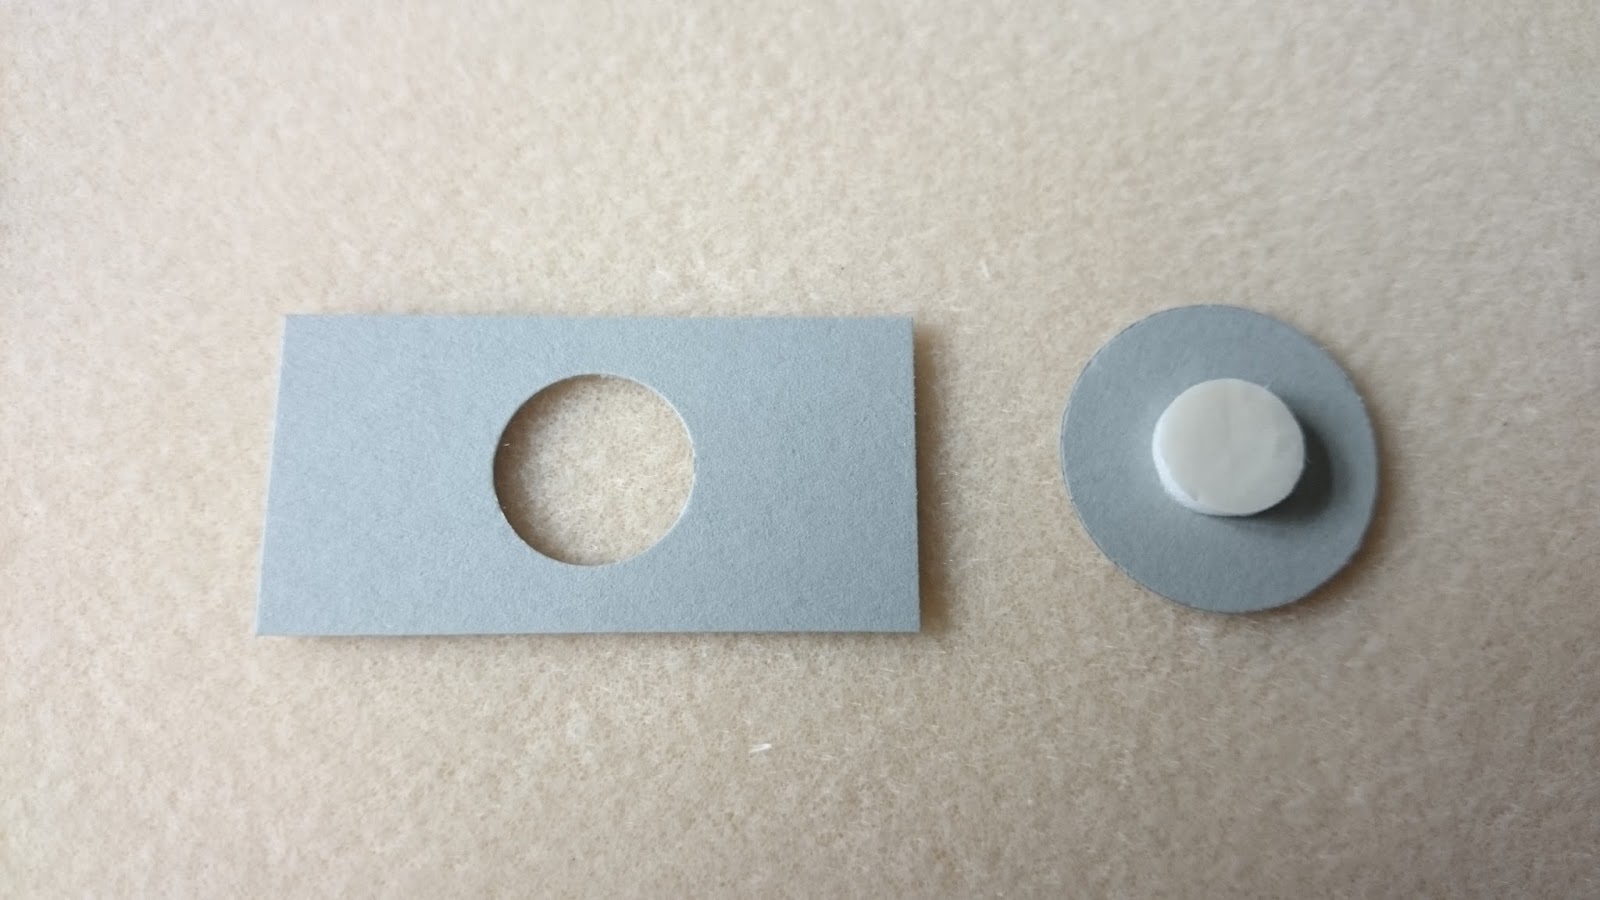
Step 5 - Cut out 3 strips of 9x5cm paper


Step 6 - Mark 1cm in from both sides and fold like the above image.


Step 7 - Choose which side you don't want to see and put a strip of double sided tape along the top.


Step 8 - Attach your flowers, stems and leaves.  You will need to make sure they are all facing away from you as you are working on the reverse of your design.


Step 9 - Once you are finished attach a scrap of paper on top of the remaining tape so that it doesn't stick to something it shoudn't later on.


Here is the front for one of my panels.


Step 10 - place a strip of double sided tape along the left tab of one of your panels.  This needs to be a panel with the most height as this will be at the back of your card.


Step 11- Attach your panel, face down so the tab sticks approximately 1cm from the right edge of the second section in from the right.  The top of your panel needs to be level with the middle line you scored.


Here is the panel folded back on itself.


Step 12 - Repeat the last step with the next two panels.  I have put the front panel a little lower to hide the panels behind.


Step 13 - Attach double sided tape to the right side of each of your panels and the tab from your larger piece of paper.


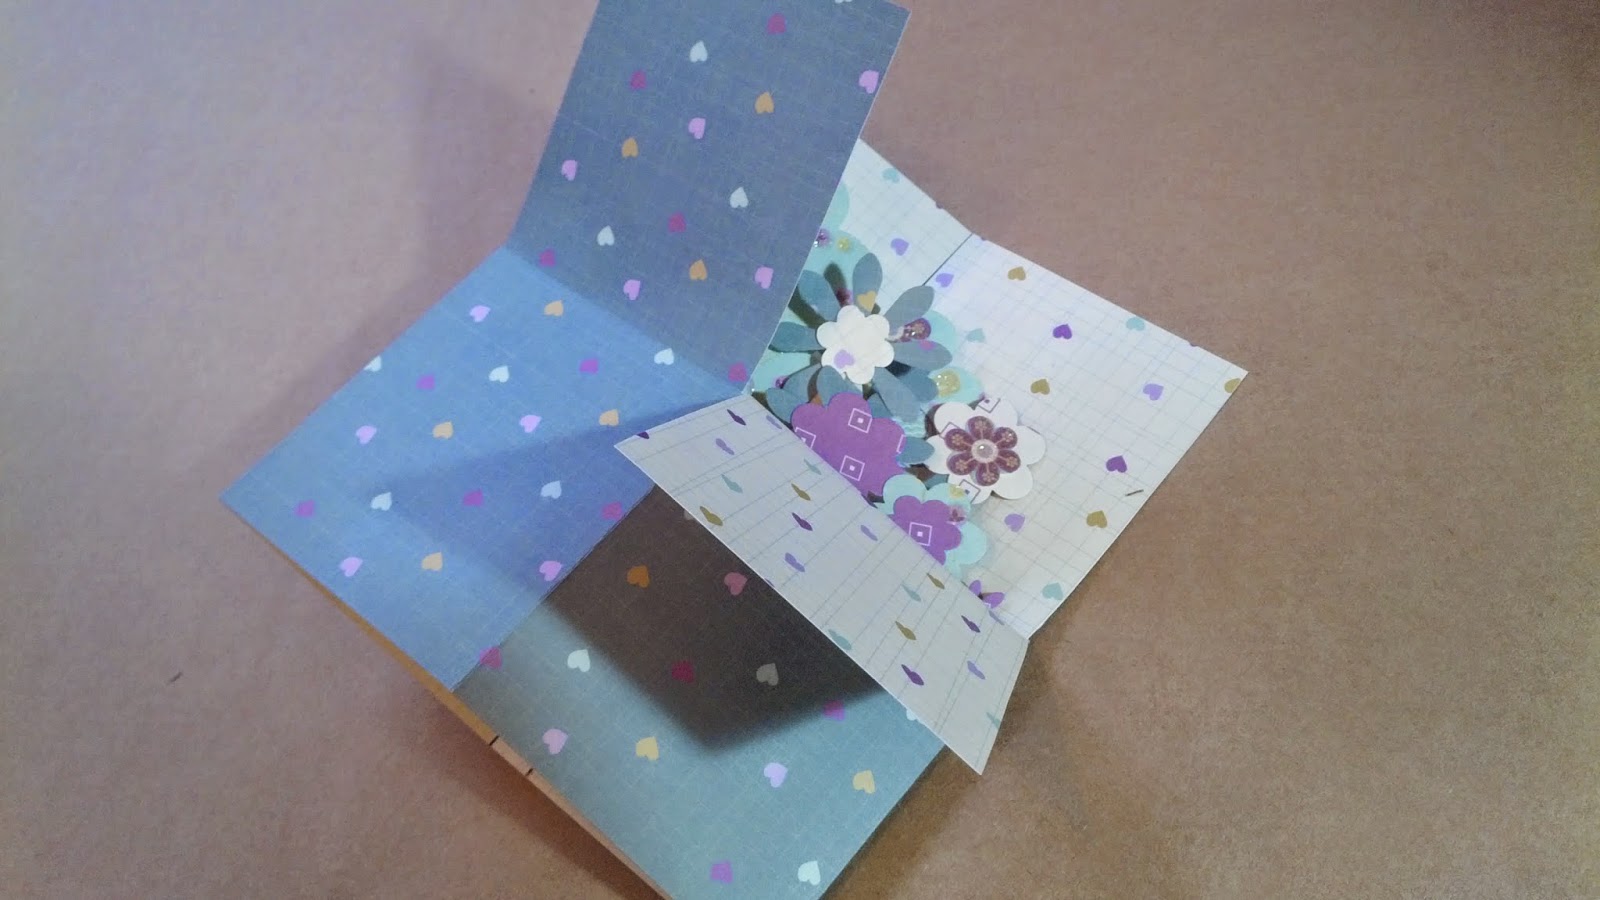
Step 14 - Well fingers crossed this will work alright! You need to fold the larger piece of paper in half.  The panels inside will stick to the top section and the main paper tab will also stick to the top.


Now you can fold down three of the side panels (not the one that you didn't score, this is the back panel)


Here is the box opening up.


Ta Da!  I haven't quite finished this one yet, I still have the side panels to decorate but I'm getting there!


Sunday, 28 September 2014

Button Doodle Cards tutorial

Just a little tutorial for you lovely guys this week.  I have been making some little button doodle cards and thought I would share how.  

I used 3x3" card blanks as I had quite little buttons.  I started by sticking a couple of buttons onto my card front. I used glue dots but I have also sewn them in place before and that looks fab too! (I was just being impatient to get to the doodling bit today!) 


Next step ..... DOODLE!  (told you this was a little tutorial!)


I doodled my buttons into flowers.  I also did a few as birds which you may spot below.


Here are just a few of my afternoons creations!  You can see that some cards I only used 1 button and on others I used 3.  I tried to make all my flowers a little different. 

Well off for a quick dip at handmade harbour before an early night ready to get packing up my 'Crafty What Nots' boxes ready for posting!  Yeah!

xxx


Saturday, 6 September 2014

Once upon a story stone - teachers packs

Well the last few weeks have been slightly crazy! I have been finishing off an order for 3 teacher sets of story stones, that's 90 pebbles, 180 images, 3 instruction booklets and 15 bags!

Here is one of the sets, all labelled and ready to go!


I am thrilled with the results but it has been quite the task!  I usually sew my own drawstring bags from fabric scraps but the thought of doing 15 was...well...very stressful! I decided to buy in some plain bags and then dye them myself.  Have you tried using the handwash dylon dyes???? Little tip...when they say wear gloves...do! and wear them all the time!  I had multi coloured hands as I only wore mine for parts of the process.  After creating my bags I ironed on my logo and the class names so the bags didn't get all muddled.


I draw each image myself, then colour and cut out before attaching to each pebble.  It has take some time to get to this technique with many a failed pebble to prove it!  I even tried stream lining the production by scanning completed images and printing off copies but they never looked as good.

Anyhow, after great lengths they are finally done and ready to go to their new homes.

I have found these school holidays to have been soooooo long!  It has been quite the juggling act to manage kids, work and crafting but I think I may have made it...just...and with a few grey hairs too I expect!  Here are a few of my recent makes.


As always I will be popping round to Handmade harbour for a peek  at some wonderful blogs!

xxx


I am also popping round to sewlicioushomedecor.