Showing posts with label Jennysis. Show all posts

Monday, 17 April 2017

Heat Embossing

Wow! look at this, two posts in less than two weeks!  Have I got my blogging mojo back????

I don't know about you, but whenever I have lots to do there is always something else I'd like to try. Recently inspiration has been popping up at odd times! Yesterday, my inspiration led me to my recently made Travelers Notebook.  I say made, it's actually a bit of a work in progress and I am adapting it as I go along.  I will share my notebook with you soon once I have a little more in it. Until then I would love to show you an insert I made.

I created an insert to wrap around one of my books. I wanted extra pockets.  I decided to use a lovely pad of paper from First Editions called 'Isabelle'  ( an old pad now unfortunately) 

The patterns are so beautiful and full of pinks, greens and browns.  This particular paper had lots of white so I thought I would use heat embossing to decorate it.  You can see the difference here between the areas that I have decorated and those I have left.


This experiment led me to have another go and produce a video tutorial for you all.  So I do hope you enjoy it. 


I have also created a video on my Facebook page on how to use the same techniques to enhance your lettering!  To watch it click here.

I am expecting supplies this week and I will have a couple of kits available to buy so you can try this at home.  I can also sell the items individually.
Total kit price is £25 (£30rrp so a fab saving!)  postage is £3

I'm linking up with Handmade Monday so do pop by and link up too if you have a blog or to come and find some wonderful blogs to read.

Jenny xx


Monday, 10 April 2017

6 Whole Months!

6 months! 6 whole  months.... I'm so sorry!
Actually those 6 months since my last post have flown by, lots of news and things to show you all but I don't think I should write an essay for my first post in such a long while!

So what's new I hear you ask..... (that is if you are shouting really loud!)
Well I had some very big decisions to make and I closed down Crafty What Nots before Christmas.  Life had got so stressful and the boxes were adding to the pressure and it started to become a chore rather than pleasure.  I think that's always the point where you should stop, but it is often very hard to know when that time is. You don't want to give up too early but you also can't run at a loss and be miserable. So choices were made and I closed down my page and website.  Oh my! what a difference that made.  I found the pressure instantly lift and I started to find my crafting mojo again!  I will still design boxes on request and I do produce kit boxes but now they are all under the name of Jennysis (so much easier to deal with one page rather than 2)
Here is a box I recently made up for someone.


So what have I been up so since??

Well my portraits and illustrating really started to take off and I became really busy designing logos too.  I never thought I could really make a living from my creative endeavours but the last few months have shown how possible it can be! (It does take a lot of hard work tho.)

I have also been involved with some lovely collaborations and been asked to design custom illustrations for some lovely businesses!  I will share more about this next time.

I will leave you today to get on with another really exciting project but in the meantime I would love to share this collaboration with you. A little while back a friend shared a video about Kung-fu Tea.  this fantastic yet odd practise inspired me to draw some tea ninjas.  These developed into the Afternoon Tea Ninjas, ready to serve you a cream tea before you even know you want it!


Well the Ninjas escalated and I have now drawn various different types on Ninjas.  So far there are Clown Ninjas, cocktail Ninjas and Saturday night out Ninjas. I have loads more ideas though so there will be more very soon!  


Now what to do with these designs!  I hit a bit of a wall until a very good friend of mine asked if she could sew one of my illustration!  Jenny from Gecko Fabric Art created the most wonderful mug rug, perfect to rest your cuppa and a cake.


  I really thought a mug would be great too so I contacted the fab Edens Garden of Gifts and she printed up some mugs for me!
Look at these!  My Ninjas are everywhere!
You can now order a mug and mug rug of your very own!


This has been such a fun collaboration and it's been really sparking my creativity.  Ninjas to come will be 'Introvert Ninjas', 'Builder Ninjas', 'Accountant Ninjas' and  'craft Ninjas'.  What sort of Ninjas would you like to see?  Would you buy other items with Ninjas on? like notebooks, t shirts, placemats etc?

Well I ended up writing more than I intended so I really must go!
Have a lovely sunny day.

I will be linking up with some other lovely crafty pages over at Handmade Monday! Do pop by to check out some fantastic pages.

Jen xx


Monday, 3 October 2016

What's new?

I can't believe it's been over a month since last blog post.  Where does the time go?

It's been a funny old month.  I have become quite busy with my Jennysis page which has been so lovely.  I have been creating some illustrations for some super customers. Here is one of my Dinosaur Tamer images which recently went to it's forever home.


I also completed this fab superhero commission.  I can't release the names yet... top secret!


By far the most popular thing I have been creating have been scratch cards.  Each card has something exciting under the sticker to scratch away.  Some hold money off while others a free gift.  They are totally personalised to each business which is fun. 


I love the different stickers that are available too.  I now have hearts and coloured circles in stock.


This one is mine!

I have found the business side of things really has taken over.  I am creating logos and business cards as well as random supplies.

Another big thing that has been keeping me busy has been my stock clearance!  I have so many pads of paper in stock and reduced so it is well worth seeing if there is anything you need!
I have most items listed on my website www.jennysis.com.

I am also able to order from some wonderful wholesalers so if you are after anything please feel free to challenge me.

Well I had better go, I am busy designing so must try and fit in a few bits before heading out.

Have a lovely week and I hope to be back next week.

I will be popping by Handmade Monday so do pop by and say hi!

Jen xx


Saturday, 4 June 2016

A little Dylusional fun!

Recently I treated myself to a few Dylusions paints.  Oh my, the colours were so beautiful and after watching numerous videos on You Tube and the new Hochanda channel I was all set to paint, paint, paint.... well nearly!  In fact it took me a few days to pluck up the courage to try them.  I love colours and my favourite place in any department store or shop has always been the stationary department.  You can keep your shoes, I can walk straight past the bags, turn my nose up at the perfumes and head straight to my favourite place! And why? Because I love the colours and variety.


Well Dylusions paints hit me the same way, the colour range was wonderful and the things people could do with them were amazing! How on earth could I top these creations! 

Well I plucked up the courage to open the pots.  I learnt some great tips, these are ...

  • -Give the pot a good shake and then tap it a few times on the table.  remove the lid and work from there rather than dipping brushes or sponges into the pot itself. (great if you accidentally contaminate it.)
  • - have a mist it handy full of water.  When you have finished with your pot, give a quick spray on the paint and close it up.  Sometimes it is worth doing this before you use it (just give it a shake again after)
  • When starting out go for colours that fit well together, ones that sit on the same side of the colour wheel.  I instinctively wanted to use green and purple but don't!! try greens and blues or yellows and greens etc and start by working with three colours
  • When you finish what you are doing then dab your sponge or brush on a clean sheet of paper or journal page until the paint is all gone.  The more you get off the sponge the more use you will get from it without the need to wash it! Also you can create some great paper to use for backing sheets later on!
  • A little goes a loooooong way!
So I thought I would share with you my first video.  I am using my Crafty What Nots colour application tool kit to create a journal page.  Hope you enjoy!


My Wholesaler is now stocking the whole range of paints, that's 18 beautiful colours!  I am selling them on my website with a great discount so if you fancy some do pop by and visit.  I will be releasing more videos on how to get the most from the paints and also using some amazing other products with them such as gesso and mica!

The colours really can depend on vibrancy depending on the surface you are using.  I used them to paint my door guard so they really are versatile!


Well I hope you all have a lovely week!  I will be revealing the contents of this months Crafty What Nots boxes and have a few lovely reviews to share with you.

I will be popping by Handmade Monday to share my blog so do pop by and see who is around!

Jen xx


Monday, 21 March 2016

How to Rollagraph

This week I have been having a play with some items I may start to stock in my online shop.  If you are a Stampin' Up fan then you will be used to 'Stampin around wheels' (a product I loved when I was a demonstrator, many moons ago!) Well I discovered that I can now stock the same thing! yeah!!!

If you havn;t seen a stamping wheel before then today is your lucky day!  Basically you have a handle, inside you can push an ink pad and then a wheel of images.  It's a fantastic way to get quick backgrounds, the beauty of it is that is self inks as it goes around which generally means an even colour (I forgot to reink in the following video so my demo goes a little splotchy!)  You don't even have to be able to roll in a straight line as you can also get a raised ruler to guide you.  I find I usually can get pretty straight on small surfaces do to the width of the roller.

So here is my little demo video, it shows you how to load the handle, roll and clean it and then there is a demo for making a simple card at the end.


Now the big question is should I stock them?  It is so hard to know what the trend is with craft supplies, especially as there are so many to choose from.  What sort of items would you like to see stocked?

I will be popping by Handmade Monday.

Jenny xx


Thursday, 3 March 2016

QR code tutorial

I don't know about you but I spot QR codes popping up all over the place, poster, menus and on business cards to name a few.  I have been including these in my monthly boxes as well to give my lovely subscribers exclusive content.  I thought I would share how I create mine so you can get creating yourself if you wish.

QR codes are accessed through an app on a mobile device (a little like a barcode) once the phone recognises it is opens up the web page associated with that code. you can create QR codes for lots of different things such as social media accounts, you tube videos and websites.  I usually use mine to link directly to a web page but recently I have been making a lot of you tube videos so I am going to create a QR using the URL from the video.

How to create a QR code

Here you can see a video tutorial I created recently on You Tube.  I have highlighted the URL (the web address you can see at the top of the window) Now copy it to your clipboard (not a real clipboard!!! it just saves it until you save something else.)

Now you need to open up a QR code generator window.  There are lots out there so it's worth seeing which you like.  Just google QR code generator.  I personally like www.qrstuff.com but that's only because I like playing with the colours!


This site really does do it step by step which is handy! so first off choose what type of data you are creating a code for.  In my case it is a YouTube video but if you are linking to a website page select the first option.  Even though I am linking to a video I will still select the first option (it seems to react the same which ever version you use but you do have the option to have YouTube written on the QR Code if you download an extra feature. (I haven't done this))


So the next step is to enter the URL you copied from your page into the box under the number 2.  If you are quick you will notice the QR code on display to the right look a bit different!
The next step is my fav bit! colour!!! Why not have a play!
Finally choose your output type.  I always select option 1 as I can then put it where I want.


So last things last you can now download your code!  I select the download button under the QR Code itself.
You should now get a download bar at the base of the screen (this will be different if you are using a mobile device )


Can you spot it in the bottom left corner?  Once it has downloaded click on the bar and it will open up your code.  If you want to find it later it will be hiding in your downloads folder until you file it elsewhere.

Here is my final code


So are you all with me so far?? Easy hey! This is the point where you can have a half time break! grab some tea and cake... you deserve it!

Ready?


Ok, so you have created your code but please... what on earth do I do with this speckled box thing now???

Now in order for you to test this and for your customers to use it you need a mobile device which can 1 have apps and 2 has a camera! So smart phones, tablets etc.  There are apps available on all platforms and you don't need anything exciting, simpler the better!

Here is the QR Code reader that I use


If you don't have one just pop into the app store, they should be free so don't panic.  Search QR Code Reader. This is on the android but I also have one on an iPad.

Once open you just get a screen like this.


Now move it to the QR code so that it is visible in the shaded area in the middle (my reader is v sensitive and even when it was showing on part of the screen it picked it up!) When taking the next shot I had to hold it this far away, any closer and the reader picked up the code!


Next step click ok


Now you can watch your video on your device!! yeah!


Well I hope that simple enough!  I feel like I've had a crafty workout! time to put up the feet and watch my video! 

Have fun creating QR code and if you would like to share any with me then why not send me some on Facebook, Twitter or Instagram and I will share a few next time!


Jenny xx

I'm linkin over to handmade Monday xx 


Tuesday, 23 February 2016

Painting murals

It's been along time since I painted a mural so I thought it was about time I got creative in the house!  Our middle one was spending more time in our room at night than in her own, (I'm sure many of you can relate) It was driving us a little mad, a three year old tornado who kicked you and stole the covers in the night!  My cunning plan was to make her room so lovely she wouldn't want to leave it!
My ponderings took me to painting a mural.  I have done a few in the past and I have to say they work much better if you can work solidly on them rather than a stolen 10 minutes here and there.  But I had to work with what I had!
These pictures are a little dark I'm afraid, I took them at bedtime so that you could see the pretty fairy lights.  They are actually little butterflies which I staple gunned around the edge of the tree.


You may recognise some of the illustrations from past posts, I tried to keep them in keeping with the portraits I create.


Emily is just showing the size of the images.  It is quite a small room so quite difficult to photograph with out distorting things somewhat.


We had this odd box in the corner of her room which actually covers a slop from the stairwell ceiling.  this made a great spot for a seat.  I upcycled an old foam mattress (I made a right mess throughout the house cutting this up! Foam everywhere.)  I then covered is in a scrap of fake suede. It's quite deep but looks fab and is mega comfy as it has a memory foam top!  I was hoping it would make a nice nook to read.


I really struggled with what paint to use.  I bought some tester pots and used those mostly. When I needed more colour I mixed acrylic paint in white emulsion.  This seemed to work well.  

I then used a thick perminant maker to go around all the edges.  Over all I liked the effect. 

Here is a little video I took.


Well that's it for now!  I have decided I will be moving my blog to my website soon.  I am trying hard to have fewer things to maintain so moving my blog will help me keep my website up to date too... hopefully!  I will keep you posted however!
Well I'm off to visit homemade Monday so see you there xx 

Jenny xx

Thursday, 18 February 2016

Valentines Day

Valentines Day.

Did you celebrate?  I must admit as I have gotten older it has become less exciting to me (think I am growing more pessimistic as each year goes on!)  either that or the thought of more stuff cluttering up my house puts me off!

Anyhow, that said I do like to try to create a little something special for the other half!


Here is my latest creation!  A family tree of us and our three girls.  This is a different format to my usual portraits, I love the quirkiness of the tree and that each of the girls names are written in the branches,   I also thought I would experiment with a little dimension and the couple in the front is raised as is the grass.  The whole thing was finished off in a Shadow frame.  The piece was 12x12".

I am not sure whether this is something I will start offering to sell, to be honest I'm not sure how to price it. What do you think?? Did you enjoy your valentines?

I'm popping by to link with handmade Monday, do pop by to say hi.

Wednesday, 17 February 2016

Getting ready for a new workshop!

I have been preparing for my first proper craftea afternoon workshop since having Lucy.  We are going to be creating spinner cards! Have you made them before?  These clever little cards require 2 pennies, round foam pads and a little creativity!  It'll be interesting to see how it goes!


This one is going to be great for those who don't like to cut!  it can be done with punches.  I just love the way the alien spins around in a circle. (sorry no video of these in motion I'm afraid) 


Cupcakes and candies


Flying high (looks less of a plane crash when you move it by hand... not sure I thought that one through!)

Have you made spinner cards before?  I will get round to a tutorial at some point.

Jen xx

I'm linking this up to handmade harbour, do pop by to say hi. 


Monday, 31 August 2015

Quick Crafty Card tutorial

Good morning to you all!  How have you been surviving the school holidays? I have certainly found three children quite the handful, especially as my middle one is still trying to adapt to having a baby sister taking up so much of my time!!

I thought I would share a little summery tutorial with you today.  Have a go at making this cute and super easy card!


Step 1 - You can use any shape card, I have chosen a square one here.  First thing you need to do is place a strip of double sided tape approximately 1.5" in from the right side (making sure that your card opens up to the right side).


Step 2 - start to stick your flower embellishments along the strip.  You need to ensure that the side of the flowers go close to the edge but not go over it (mine here is a little close!), the top ones can go over the edge top and bottom.  


Step 3 - Make sure all the tape is covered (you can always add a little more tape and layer your flowers if you wish)


Step 4 - cut around the edge of your flowers, leaving a little border of white around the edge.


Why not add some ribbon or sentiment to finish off your card!!


In the wonderful world of Crafty What Nots I have just launched the 'Crafty Night Before Christmas box'  A Christmas eve box with a twist.  Just like the normal monthly boxes this one-off box is full of crafty goodies, tutorials and a special handmade gift.

Each box is sent out on the 1st December and is available in 4 age ranges - under 5, 5+, teenager and adult!!

So if you fancy starting a new tradition or after an unusual Christmas present for a loved one (or yourself!!)  Do pop buy and find out more!  I am also happy to ship internationally so if you would like a box but not in the UK don't fret (the postage is increased however as you can imagine!)


I am so excited about these boxes and been planning like made!!!

In other news I have been picking up the old pencil again and been making family portraits for some lovely people.  Here is the first one I did.  I am currently running an offer on these. 25% off the first five paid orders I have (there are only two slots left!!)


Well I am going to link up with Handmade Monday (something I haven't been able to do in ages!)
Have a lovely week folks xx

Monday, 10 August 2015

Shell Candles tutorial

Happy Monday one and all!

I know, I know... I havn't been around for a while.  Life has be quite chaotic especially after the birth of my latest little one!

I thought I would share a tutorial with you which didn't make it into the last Crafty What Nots box (I just couldn't find enough shells!)

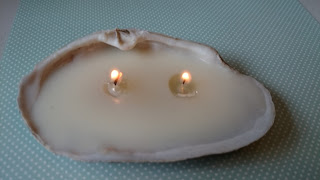
Shell candles
You will need ~ 1 large shell which will sit solidly on a flat surface (you don't want your candle to rock or fall over!!) 2 or more night lights depending on the size of your shell, oven.


Step 1 - take the wax part of your night light out of it's case (make sure it is one with a metal case!)


Step 2 - carefully pull the wick out of the candle from the base.


NOTE - my wick actually came out of the metal base, if this happens to you then you need to enlarge the hole where it attaches and pop it back in.  


I used a cocktail stick to make mine bigger.


Once you have removed your wicks place them in your shell.  I thought that this shell would need two candles hence why there are two wicks. If your shell is particularly deep it may be worth putting them in shallower areas or resting them on wax to raise them up. 


Pop your wax back in their metal containers and place on a baking tray in the oven.  I put the heat up to 220`C and watched it until it had melted. You could place on a tray on a gas hob or use a heat gun if you'd rather (beware that the wax doesn't spray with the pressure of the heat if you use the latter)


Step 5 - carefully and with a towel or pliers pour the wax into your shell.  I was worried that the wax would make the wicks float but they didn't thankfully!


Here is the difference between using 1 and 2 candles!


Step 6 - Now let it cool on a flat surface.  Now you can pop it in a safe place and light!


I can imagine these would look lovely around the bath!  Do remember tho... be safe!  Never leave them unattended!

I have been having a bit of a sort out in the craft room and collected all the Christmas stock I have.  I have updated the website and reduced all the Christmas prices so if you are after some lovely papers do pop by and see what's available.


http://jennysis.com/?product_cat=christmas
There are limited stocks although if you are after more I am still able to get some lines!