Showing posts with label craft. Show all posts

Sunday, 23 October 2016

Quarterly Craft Box

This quarter I have decided to try something a little different.  Rather than the next quarterly box being a mystery I will be releasing images daily of items that will be found within it! Eeeek!
I have been having lots of ponderings about my boxes and was thinking seriously about  stopping them altogether.  But before I hand in the crafty box ticket I thought I would try something a little different.

I was thinking about what people want to buy, do you guys really want to spend £40 on a box of stuff that you have no idea what's inside other than it will contain 4 craft kits and a few gifts? Well of course not! Let's face it, nowadays you want to know what your getting and although there are some very successful mystery boxes out there on the market, crafters, it seems aren't as interested in Crafty What Nots boxes as I had hoped.

So the Winter box (or the Snuggle box as I like to call it) is an exciting box where you will know exactly what your going to get.

Another exciting element of the box is that it is a collaboration among 10 small businesses!  So there is such a big variety (in fact I found it very hard to stop buying lovely things to put in!)
Here is an image of all the businesses taking part.


Everyday on my page I am doing a countdown.  So far we are at day 17.  Here you can see some of the things included in the box.  So far we have...
Pom pom pen
fudge
heart charm keyring
oil burner and wax melts
wooden heart embellishments
pretty ribbons
bunny ring
felt making kit

Other items will follow so if you would like to be kept up to date and find out what is in the next box then do visit either my Facebook page here or Instagram here


The countdown will finish a week before the order books close.  There are only a small limited number of boxes available so do let me know if you are interested to avoid disappointment.
I am also more than happy to set up a payment plan.

I do hope you have a great week and fingers crossed I will be back again next week.
I will be sharing my blog over at Handmade Monday, My fav place to be after the weekend.

Jen xx


Sunday, 17 July 2016

What's New Pussy Cat?

Welcome once more to my little blog page.

Since last time I have launched the Autumn mystery gift and craft box and those wishing to buy it can enjoy 20% off with the code AUTUMN.


I am so excited to have 7 pages collaborating with this box! It's going to be wonderful and the gifts being made are beautiful!  I so hope others are as excited as me as it will all be very different from my monthly boxes!

In other news I have launched two new crafty kit boxes.


Lavender Wands


Origami Flower 

Each kit includes everything you need to create either the flowers or the wands (yes including the Lavender!)

I have also opened my order books for the Christmas Eve Box! (I can't believe I said that!)  This little box of festive delight will also be a collaboration with small businesses and bring you gifts and craft kits to enjoy on Christmas Eve!


What a wonderful way to relax before the hustle and bustle of the big day!

So what else? Well last week I was very privileged to run two workshops.  We have an event called 'Try This' which runs in Dorchester and encourages people to try things out.  There was a whole program of interesting things to learn or try including beekeeping!  Well I volunteered to run a couple of craft workshops, they both filled up really quick and I even had a waiting list!!!  Both sessions went really well.  I forgot to take pictures of the send (we made paper handbags) but I took a few of the first.  Here are some of the wonderful creations made by the lovely ladies who joined me to learn to make origami flowers. 


Well I better leave you now before I witter on too much!

I will be popping by to share my little blog over at Handmade Monday so if you have a blog or would love to find some new ones to read then do pop by!

Until next time.

Jen xx


Friday, 4 December 2015

Felt heart Christmas decoration tutorial

Felt Hearts

I thought I would share some creations I recently made for Decembers Crafty What Nots box.
This months theme was Silent night and was full of icy blues and silvers. As I couldn't fit and more tutorial in the box I thought I would share my method for making these little heart decorations.


These really are so simple. Sorry no step by step photos at the moment.

Step 1 - cut out two hearts out of felt
Step 2 - embellish your hearts how ever you please.  I embroidered a snowflake on one and attached buttons to another, you could sew an initial or just leave blank if you wish.
Step 3 - place your hearts together and sew around the edges, I used a blanket stitch. leave an inch gap and fill with stuffing.  I actually used felt offcuts from my samples, why no add some thing fragranced?
Step 4 - sew up the gap and thread a loop to the top and hey presto!!!

Why not make lots and create a garland? Or add a pocket to the back of each and turn them into advent calendars??

The free personal gift this month was a hand embroidered felt hand warmer.  I will blog a tutorial on how to make that soon!


Well I had better go and finish creating the Christmas eve boxes!!

Jenny xx


Monday, 28 September 2015

Christmas... already?

How are you all this week?  Do you feel those Christmassy feelings of warmth and goodwill sweeping over you yet? The burning desire to get the tinsel out and the mulled wine cooking? No?? Well who can blame you, Christmas is fast approaching but with some lovely sunny days I must admit I am being consumed by Autumn loveliness! The stunning autumn colours and the falling leaves.  All that aside however as a crafter we have to think about Christmas far too early.  I know many who have been making since way before the school holidays!  I thought I would share my latest Christmas venture with you all.

I was introduced to Christmas Eve boxes a few months back. It seems something that originated in America and goes hand in hand with the 'Elf on the Shelf'.  Don't worry if you are new to Elf on the Shelf too.  The general idea in a nutshell, is you have a small toy elf who arrives on the 1st December.  He watches your children everyday and reports back to Santa every night to tell him if they have been good or not! When the elf returns in the morning he gets up to a little mischief.  He may spill cereal all over the counter or tie your shoe laces together etc. (this is where parents have fun and get creative!)  Then on Christmas Eve the elf leaves to go and help Santa sort out the toys and load the sleigh.  When the elf goes he leaves behind a Christmas Eve box, a box full of treasures.  Usually these treasures seem to consist of a Christmas film, book, slippers, new pyjamas and a few yummies to enjoy while watching your film.  Well my pondering took me to... what if the Christmas box contained lots of crafting goodies!!! How about instead of being full of food and dvd's etc that it contained tutorials and craft supplies to create some Christmas crafting memories.  So I give you the Crafty Night Before Christmas box!


Each box contains at least three tutorials, all the crafty supplies you need to complete them and lots extra and a small handmade gift from me to you!  I have designed 4 different boxes based on ages.  There is the under 5's, 5+, teenager and adult.  I am also more than happy to personalised.


Well I'm off to carry on planning my boxes. If you want to found out more or take a peek at my brand new kit box v visit www.craftywhatnots.com

I'm stopping off to visit all those lovely blogs at Handmade Monday so why not pop over and see what others have been up to.
 Xxx


Monday, 31 August 2015

Quick Crafty Card tutorial

Good morning to you all!  How have you been surviving the school holidays? I have certainly found three children quite the handful, especially as my middle one is still trying to adapt to having a baby sister taking up so much of my time!!

I thought I would share a little summery tutorial with you today.  Have a go at making this cute and super easy card!


Step 1 - You can use any shape card, I have chosen a square one here.  First thing you need to do is place a strip of double sided tape approximately 1.5" in from the right side (making sure that your card opens up to the right side).


Step 2 - start to stick your flower embellishments along the strip.  You need to ensure that the side of the flowers go close to the edge but not go over it (mine here is a little close!), the top ones can go over the edge top and bottom.  


Step 3 - Make sure all the tape is covered (you can always add a little more tape and layer your flowers if you wish)


Step 4 - cut around the edge of your flowers, leaving a little border of white around the edge.


Why not add some ribbon or sentiment to finish off your card!!


In the wonderful world of Crafty What Nots I have just launched the 'Crafty Night Before Christmas box'  A Christmas eve box with a twist.  Just like the normal monthly boxes this one-off box is full of crafty goodies, tutorials and a special handmade gift.

Each box is sent out on the 1st December and is available in 4 age ranges - under 5, 5+, teenager and adult!!

So if you fancy starting a new tradition or after an unusual Christmas present for a loved one (or yourself!!)  Do pop buy and find out more!  I am also happy to ship internationally so if you would like a box but not in the UK don't fret (the postage is increased however as you can imagine!)


I am so excited about these boxes and been planning like made!!!

In other news I have been picking up the old pencil again and been making family portraits for some lovely people.  Here is the first one I did.  I am currently running an offer on these. 25% off the first five paid orders I have (there are only two slots left!!)


Well I am going to link up with Handmade Monday (something I haven't been able to do in ages!)
Have a lovely week folks xx

Tuesday, 5 August 2014

Mini Album 1 - tutorial

Mini Album ~ 1

I thought I would take some time out in my busy preparation for my next workshop to share another tutorial!  I love this little book and I have used it in scrapbooks, as brag books and even as sentimental cards.  It is very simple to make, using very few materials and demonstrating how not a lot can make something wonderful.


To start, you will need 1 sheet of double sided 12x12" paper (or 4 6x6" sheets)  I also used up a few scraps in coordinating colours.  You will also need a bone folder (I use lollypop sticks) Double sided tape or glue (I use both to be extra safe!) length of ribbon to wrap around your final book, pens and photos and embellishments (I use punches to create mine so that they always match my work)


Step 1 - You will need to cut up your 12x12" sheet into 4 6x6" (I know what your thinking.... why did I bother saying 12x12"? well I like to save paper where I can and I love the idea of creating this from one sheet! )


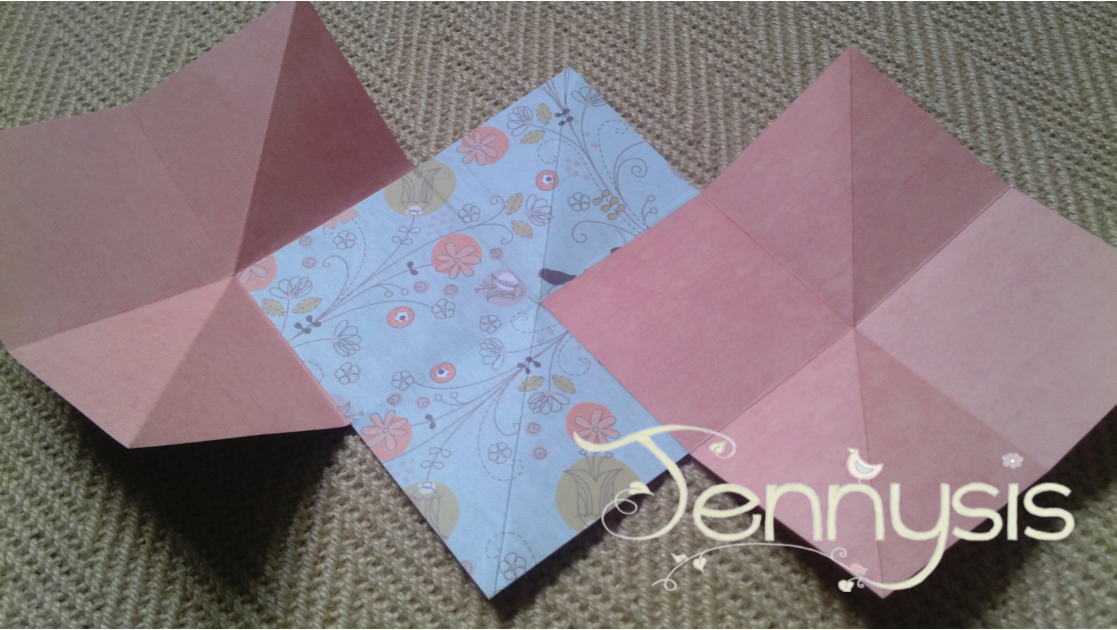
step 2 - take one of your squares and fold in half widthways and then lengthways.  Now fold it diagonally (but only one way)  Now make sure all folds are well folded (use bone folder or lolly stick for this)  It is also a good idea to fold each fold in both directions as it will help with folding later on.


Repeat with another 2 sheets so you have 3 in all.


Step 3 - You will need to fold up each sheet so that they look like this.  (very hard to explain so I am hoping the picture tells all!)  I have made sure that the pattern is on the inside of one and the outside of two.  You can experiment with this and if you used all different papers then that's even more to play with!.


Step 4 - Place double sided tape in the bottom right square of one of your sheets.  I also put a few dabs of glue on my tape for added strength.


Step 5 - Now stick the top  left square of a new sheet over the top of the bottom right square you just taped.  As you can see I have turned my paper around so that the pattern is showing on my second sheet.


Step 6 - Repeat the last two steps and fix the last sheet in place.  You could always add more squares here if you wish or even just stick to 1.  I do suggest however that you work in odd numbers as it looks far neater when closed.


Step 7 - I have just folded up my album so far.  It takes a little practise but you are aiming for the pages to all flatten into a small 3x3" square.


Step 8 - Turn your book over so that the bottom is on the top. (until you decorate this doesn't necessarily matter but you may have one side you like more than the other)  You need to stick your ribbon in the center of the back panel like shown.  I used tape and glue!


Step 9 - Cut a 2.5x2.5" square and stick it over the ribbon to tidy it up and cover the glue.  ( I rounded my corners....Just because!)


Step 10 - Now get creative!!!  make sure your ribbon is to the right of you, start at the left and have fun!  I put pictures on the flat squares and on the mountain folds I placed large flowers (if you do this only stick half of the flower so that it can still fold.)  You can always put more pics on the folds.  DO NOT put anything on the valley folds, your book won't fold if the valley folds are covered.


Here is my book all folded (you may notice that the ribbon isn't in this picture, I actually put mine on last but decided that it would have been better to do it earlier!)


Step 11 - Pop a tag or scrap of paper on the front with a title so you know what is in side it!


Tie up your ribbon and Ta Dah!!! 

Other variations on keeping your book together could include elastic popped over the top going down the back and then popping over the bottom.  I have even used magnets in the past.  I would love to see what you create from this!

As always here is the supplies button to take you to my website so you can see the materials I used.


Hope it goes well
Off to dip my toes at the Handmade harbour, do pop over and say hi!


xx


Monday, 9 June 2014

Ready..... Steady..... Nearly go!

OOOOh ... so excited! I'm nearly ready to open the virtual doors on my new website.  I've been busy creating new wonders to stock those cyber shelves and very soon the world will be host to yet another online crafty shop!  Jennysis will not only have ready made products to buy but also all the materials for you to give them a go yourself!

Here is a sneaky peak at the 'New Bloom' range


Plain A6 notebooks.


Circle or stripy buttons


There will be all sorts of other things including the paper pads I use to create them.

The other range I will be opening with is 'New Leaf'  I just love the earth tones and sparkly papers.


This little set of notecards will either come premade in a small box or come as a kit with instructions!  I have made one for the 'New Bloom' range too but do you think I can find the photo?????


I particualry love these little draws.  Even my little'ns toy sheep managed to make an appearance!

Well I can hear the subtle crys of a waking baby so better go and de-craft the house super quick before I end up with glue on the ceiling!

Happy crafting all you wonderful people!  Thanks for stopping by my page.  I would love to hear your thoughts on my products, would be good to get some feedback before launching into the big bad world!

Am popping over to Handmade Harbour to checkout some of the wonderful talent out there.


xxx


Sunday, 1 June 2014

Smashing Fun! Paper cuts and books!

What a week!

Well it has been a crafty week!  I have made wooden and also recycled keyrings, taught a friend to make a box, tried paper cutting again and done lots of Smash booking!  Oh and created a teachers set of story stones.  (It has been busy, not sure where the energy came from, just hope it lasts)

I thought I would quickly show you my little paper cut.  I am so pleased with it, mainly because I didn't make any mistakes and that I didn't try to challenge myself too far which has been part of my down fall in the past I think.  Any how, what you do you reckon?  I love it in black, that may be my new thing!


I don't know if you remember my big crafty challenge last week, but I made a smashbook in the process and even gave a tutorial on how to make it.  Well I thought I should use it, so I made a start filling it with memories from our recent adventure to Scotland.  We only stayed a couple of days, but did do a lot.  I thought I would give you a sneaky peak at some of the pages I have done.  I haven't done any journalling yet but I have managed to sort out photos and memorabilia from our visits.


Hope you can see the layouts alright, I have filled the book.  The thing I particularity like about Smashbooking is that there are just no rules!  I used to love to scrapbook, but it would take hours to decide on layouts and colours and embellishments to go with them etc.
  
Smash books are just fab!  

I know I am using a brand name here and I am using my own book, does this matter?  I am not sure.  There are several different type of journalling book like these, Smash is one, La de dah another and even Stampin up have jumped on the wagon and created their own.  I love all the accessories that go with these but to be honest I love making the books and using them, They are far more personalised.  My other bug bear with the commercial book, is that often you like the page picture so much, you don't want to put anything on it.  No matter what you would call it, the thing that is clear is that it is exactly how scrapbooking used to be, before the posh papers and special albums.  Scrapbooking has evolved and is now a no holes barred, no rules way of sticking memories or interesting items collected on your journey through life into a book quickly.

If you are interested in starting having a go at journalling like this then I found loads of videos online, there are lots of images to see on Pinterest, I even have a board all about it so feel free to pop by and have a browse.

Well I think maybe I have gone on enough and am off to go and see what wonders are to be found at Handmade Harbour (my fav Sun/Mon hangout!)  Hope to see you there.

xxx