Mini Album ~ 1
I thought I would take some time out in my busy preparation for my next workshop to share another tutorial! I love this little book and I have used it in scrapbooks, as brag books and even as sentimental cards. It is very simple to make, using very few materials and demonstrating how not a lot can make something wonderful.
To start, you will need 1 sheet of double sided 12x12" paper (or 4 6x6" sheets) I also used up a few scraps in coordinating colours. You will also need a bone folder (I use lollypop sticks) Double sided tape or glue (I use both to be extra safe!) length of ribbon to wrap around your final book, pens and photos and embellishments (I use punches to create mine so that they always match my work)
Step 1 - You will need to cut up your 12x12" sheet into 4 6x6" (I know what your thinking.... why did I bother saying 12x12"? well I like to save paper where I can and I love the idea of creating this from one sheet! )
step 2 - take one of your squares and fold in half widthways and then lengthways. Now fold it diagonally (but only one way) Now make sure all folds are well folded (use bone folder or lolly stick for this) It is also a good idea to fold each fold in both directions as it will help with folding later on.
Repeat with another 2 sheets so you have 3 in all.
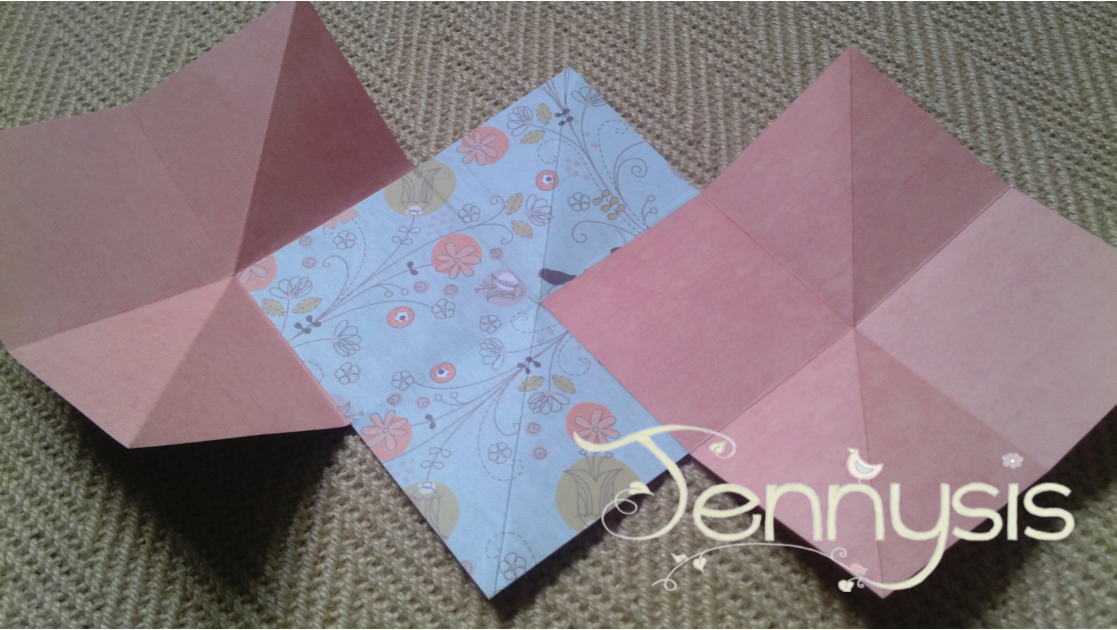
Step 3 - You will need to fold up each sheet so that they look like this. (very hard to explain so I am hoping the picture tells all!) I have made sure that the pattern is on the inside of one and the outside of two. You can experiment with this and if you used all different papers then that's even more to play with!.
Step 4 - Place double sided tape in the bottom right square of one of your sheets. I also put a few dabs of glue on my tape for added strength.
Step 5 - Now stick the top left square of a new sheet over the top of the bottom right square you just taped. As you can see I have turned my paper around so that the pattern is showing on my second sheet.
Step 6 - Repeat the last two steps and fix the last sheet in place. You could always add more squares here if you wish or even just stick to 1. I do suggest however that you work in odd numbers as it looks far neater when closed.
Step 7 - I have just folded up my album so far. It takes a little practise but you are aiming for the pages to all flatten into a small 3x3" square.
Step 8 - Turn your book over so that the bottom is on the top. (until you decorate this doesn't necessarily matter but you may have one side you like more than the other) You need to stick your ribbon in the center of the back panel like shown. I used tape and glue!
Step 9 - Cut a 2.5x2.5" square and stick it over the ribbon to tidy it up and cover the glue. ( I rounded my corners....Just because!)
Step 10 - Now get creative!!! make sure your ribbon is to the right of you, start at the left and have fun! I put pictures on the flat squares and on the mountain folds I placed large flowers (if you do this only stick half of the flower so that it can still fold.) You can always put more pics on the folds. DO NOT put anything on the valley folds, your book won't fold if the valley folds are covered.
Here is my book all folded (you may notice that the ribbon isn't in this picture, I actually put mine on last but decided that it would have been better to do it earlier!)
Step 11 - Pop a tag or scrap of paper on the front with a title so you know what is in side it!
Tie up your ribbon and Ta Dah!!!
Other variations on keeping your book together could include elastic popped over the top going down the back and then popping over the bottom. I have even used magnets in the past. I would love to see what you create from this!
As always here is the supplies button to take you to my website so you can see the materials I used.
Hope it goes well
Off to dip my toes at the Handmade harbour, do pop over and say hi!
xx


No comments:
Post a Comment