Monday, 19 January 2015

Button Charm Bracelet Tutorial

This week I thought I would show you how to make this really cute button bracelet! I love buttons and have seen all sorts of similar bracelets so thought I would give it a go and make my own!


Button Charm Bracelet

You will need ~ Length of chain that will go around your wrist (only just). A selection of buttons (I used around 24) You need to make sure the buttons aren't too big or that the hole is too far away from the edge.  Enough large jump rings for each button plus two spare. A claw clasp (or something of your choosing). Pair of pliers.


Step 1 ~ Take a jump ring and using the pliers twist it open.  DO NOT pull the ring apart, the secret is to twist it then it will close better.


Step 2 ~ Add a button and then hook the chain into the same jump ring.


Step 3 ~ Close the jump ring by twisting it shut.  You have now added your first button charm to your bracelet.


Step 4 ~ Keep adding button charms to your length of chain until you have the desired amount.  You could be far more creative with the colours than me and add different shaped buttons and beads if you wish to add variety!

Step 5 ~ Take a jump ring and add to one end, this will be where the clasp catches.


Step 6 ~ Now take another jump ring and attach the claw clasp to the other end in the same way that you attached the buttons.


Now all that's left to do is put it on and wear with pride!


I thought these might look great layered!  I could create lots of button charm bracelets in different shades and wear several at the same time to compliment what I'm wearing!

In other news...I have set up a new website for my Crafty What Nots postal mystery craft boxes! I am still finalising the payment page but it is all up to date with images and reviews as well as crafty questions.  www.craftywhatnots.com.  I can also be found on facebook www.facebook.com/craftywhatnotsbox.  I thought this month I would post a mini spoiler for the next box! Do you think it would add to the excitement?  Here it is...can you guess what they are going to be?


Well I thought I would leave you with a lovely view!  Yesterday we had a really wonderful walk on a beach we haven't visited before (not sure of it's name but it is in Weymouth Bay)
  

Wasn't nice to have some sun! 

I'm off now to link up with the fab Handmade harbour and Creative Mondays!  

Have a great week xx


Thursday, 15 January 2015

Happy Friday ... delivery!!

Now I don't know about you but one thing that does make me do a little jig round the house are deliveries!!! Boxes of fab goodies!


I can't show you the contents I'm afraid as there were lots of goodies to go into the next two months of Crafty What Nots! But there was lots of things to make me dance! (maybe in my head as I would look an idiot prancing round my house!)

What has made you happy this week??  I will be popping round to Planet Penny to see what others have been up to!  Do pop along and meet some new friends! xxx
planet-penny-happy-friday

Sunday, 11 January 2015

Macramé Beaded Bracelet Tutorial

Where has this weekend gone??? I have had quite the busy week planning pretty crafts for the latest Crafty What Nots box, With a love theme I am having terrible trouble narrowing down the options to include! Oh the choices!!!! 

I thought it was about time I popped another tutorial your way!  Here is a little one on how to make a beaded bracelet.  I love the simplicity (it is easy!!! honest!)

beaded-macramé-bracelet-tutorial

Beaded Macramé bracelet
You will need a pencil, 2m length of cord and a selection of beads with big enough holes for the cord to pass through.


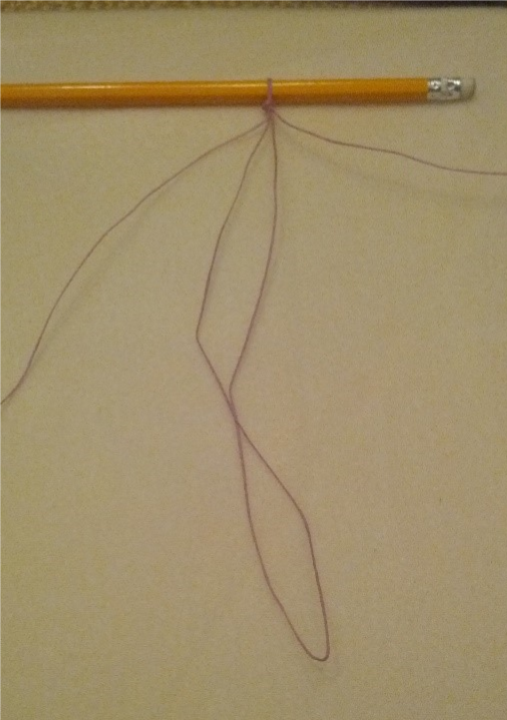
Step 1 – Fold your cord in half and measure 30cm from the fold.  Create a loop and knot so you can just fit a pencil through the loop. Lay the threads so that the fold is pointing towards you and the two long ends lay either side of the shorter one.


Step 2 – thread a bead onto the short ends which are still joined at the end. (always keep this length pointing towards you).
  

Step 3 – take the left thread, pass it under the middle threads and over the right thread.

  
Step 4 – now take the right thread, pass it over the middle threads and post it through the left hand loop so that it travels under the left thread. This is the basic knot we will use throughout.


Step 5 – gently pull both threads evenly, they should create a knot which surrounds your first bead.


Step 6 – Using the same techniques create another knot, this time without a bead.  Do this 5 times to create a short knot length.
  

Step 7 – add another bead like you did in step 2 and then repeat steps 3-5.   Now knot 5 more knots without beads.  Alternate beads and knots until your bracelet is long enough to go around your wrist.


Step 8 – once the length is long enough, tie a knot after the last bead using all 4 threads.  Carefully cut away the short folded thread up to the knot (Your knot should keep your threads in place, however if you wish to add a little dab of nail varnish or glue to the knot is will help secure it further.


 Step 9 – Lastly thread a bead onto the last long threads, let it sit around 1cm down and then knot the thread a couple of times so that the bead won’t fall off.  Add a dab of glue or nail varnish to stop the thread unravelling. 


This last bead is your catch!  Post it through the loop you made in step 1 and hey presto!  All ready to wear!

Well I will be popping off to link up with Handmade Harbour and see what other lovely bloggers have been up to!  I am also linking up to

Have a creative time xxx

Friday, 9 January 2015

Just a little ...Happy Friday!

I love getting blog updates from some of my fav bloggers, Planet Penny is one I try to read often and she is starting a Happy Friday linky party!  What a fab idea!  I think starting a new year is a perfect opportunity to be positive and start new things!  So I thought I would join in with a pic that has made me happy during the last week!


Now, unusually for me I hadn't actually taken many photos since the new year, but this one is of my youngest.  In her infinite wisdom, she decided that Upsy Daisy needed a new nappy and carried her in to me with an open nappy and a wet wipe!  Was so funny.  She then proceeded to wipe her all over and then proudly stood up and said 'finished' (a new word) and walked off!  I caught that bit on video but wasn't sure how to add that! lol.

I just love the innocence of children and it amazes me the funny little things they do.  I always wonder how their little minds work!

Anyhow, I had better get back to getting next months Crafty What Nots boxes ready!  They take so much planning and designing but they are so worth it.  I have been so lucky to receive another truly lovely message from one of my subscribers which always spurs me on and keeps me enthused about my project!

Don't forget, if you want to order February's romantic 'J'Adore' Crafty What Nots box then the deadline is 15th January.  Remember it is always a surprise, there is always a personal gift made for you by myself and at least 2 tutorials as well as lots of crafting goodies for only £15 inc P&P!!

So until next time, happy crafting and don't forget you can follow me on Pinterest, Twitter, Facebook, Instagram, Bloglovin and Tsu so please do pop round and say hi!

xxx


Tuesday, 6 January 2015

New Year ...new start?

Well welcome one and all to 2015!  Has it been a good start for you so far?  I must admit to not a lot of crafting so far but I thought I would share some of my pre Christmas makes and the latest Crafty What Nots box with you.


I made these little earrings for presents.  The one on the left is a plain domed square with a clear bead.  The one on the right has a hammered texture (sorry photos aren't great) this earring has a blue bead.   And I did indeed make a pair of each! They were so incredibly cute, I think I may just have to make a few more pairs!

Before Christmas I was commissioned to make a couple of one off individual Crafty What Nots boxes.  I thought I would share the contents with you.  They weren't festive inside as they would be received on Christmas day and would obviously be too late to start anything Christmassy!


Each box was different and designed individually to match the recipients colour preferences and ages.  As they were going to the same house I also made sure that the tutorials were different so they could swap and try each others.  Both boxes were packed with papers and embellishments, tutorials and a handmade personalised scrapbook in a tin.  There were stamps and ink pads, stickers and two tutorials!  Hopefully they were loved as much as I enjoyed creating these boxes.


Now for January's Crafty What Nots box.  This month was Chic Noir. This gorgeous box was full of lovely blacks and creams,  papers, pearl card, a variety of embellishments and card banks and of course a couple of tutorials and a personal handmade gift.


The first tutorial was to make this shiny bracelet with super sparkly crystal beads and fake pearls.  


The next tutorial was to make this pocketed mini album.  The beauty of this little book is it is made from just one piece of paper and requires no glue or tape (unless you want to that is).


I added some embellishments to the front and a few inside the book as well.


Here you can see the inside pockets, just right to pop in tickets or photos.


Here is a card I made using the really lovely papers.  They are so thick and great quality that they don't need to be mounted to make this easel card which makes life much easier!


I also made some bunting and attached them using the little pegs in the set to the cord.


This month I made little beaded bookmarks for each of my subscribers.  I think I may have to do this as a tutorial soon!

If you want to try a Crafty What Nots box yourself they are only £15 inc P&P.  Just pop over to www.jennysis.com to look at reviews and past boxes as well ordering info.  Deadlines for each month are the 15th of the previous month so hurry before you miss out!  Next month is J'adore, just a little love!

xxx


Tuesday, 16 December 2014

Christmassy stuff!

Well the lurgy has attacked our house! So only a short post from me this week.  I managed a couple of crafty endeavours.  Here is a little experiment I have been working on.  I have illustrated a couple of books in the past and I thought I would have a go at trying to make them 3d!  Here is the start of Pip and Pigley.  I used this lovely air dry clay from Woodware, it is so light and dries easily within 24 hours.


I made little wire bodies and bulked out with clay.  Then I started to paper mache with kitchen roll scraps.  So far I'm quite pleased! 


Here is a family portrait I did last year.  The littlest is Pigley (my youngest) and the older girl is Pip (my oldest)  Hopefully you can begin to see how they are forming in my models!  My big plan is to create a little model of everyone in our little family!


I also got myself in gear to put up my alternative Christmas decs!  I decided that the youngest is still far too little to not try to pull a tree down so I created a swag instead!  Nowhere to put presents but looks so pretty!


I am so fussy about my tree/swag!  I love baubles which reflect or refract the light so there are lots of whites, translucent baubles and glass shapes!


I have also managed a little bit of silversmithing!  My degree was in metalwork and jewellery but in all honesty I haven't really done much in the past ....erm  too many..years! It was so nice to work with the silver again.  Sorry the photo isn't that good.  It is a domed hammered square with a blue bead.  They look much better in reality!

Well better get on with piles of work and trying not to drown in my stinky cold!

Hope you are all well and getting in full swing for Christmas.  Oh and don't forget to pop by handmade harbour.

xxx

Tuesday, 9 December 2014

December's Crafty What Nots revealed!

I just can't believe how quickly Christmas is coming! November was so hectic. I thoughti would share the latest Crafty What Nots with you. 


Here is the box opened up! December's box contained 24 6x6" Christmas papers, 3 Bazille Basics green 6x6" card stock, materials and tutorial to make a Christmas bauble garland, clay hanging decorations and origami gift boxes. As usual lots of embellishments, card blanks and sticky stuff, pearlised card and to top it off a personalised scrapbook in a tin and a handmade card.


Here is a close up of the scrapbook in a tin. It is a 5x5" tin which I decorated with one of this months papers, a heart doily and beautiful blossoms and buttons also found in this months box. 


Inside, the tin it comes with folded white paper which fold into 10 pages. I then trimmed down coordinating papers and rounded the corners. I also cut out some journalling shapes so all that's needed now are some festive photos and a few memories! 


Here is the little Christmas card I made for each box. Again using buttons found in the box. This was also the same as the enclosed card blanks!


Here's a sample of the hanging decoration kit and the origami box kit


I also popped in some inspiration for other makes, one of these cards has a chippie bauble from the bauble garland kit!


Here is a pyramid card idea too!


Well I hope you have a wonderful week! Of you would like to order January's Crafty What Nots box the deadline is the 15th December. The theme will be Noir Chic! A bit of sophistication for the new year! Pop over to www.Jennysis.com to find out more, read reviews or even get hold of some of the past box contents!! 

I'm off to the fab handmade harbour to see what everyone else has been up to, hope you can pop along too! 

Xx