Sunday 9 December 2018

Reflections and Portraits

Hello my lovely friends.  How have you been?  (I guess I'm not really expecting an answer, I have deserted you for quite a while now it seems!

So what's been going on I might hear you ask? 

This year has been pretty hectic, lots of orders, new products and kids keeping me occupied.

I was also diagnosed  with Fibro this year and it made me reevaluate a few things.  I noticed I was getting increasing pain in my hands and my eyesight was getting worse so I found I was making more mistakes.  Don't even get me started on the brain fog, I have to write everything down otherwise it's instantly forgotten. 

Well in an attempt to be more consistent with my illustration I have moved to using an IPad Pro for all my designing and then printing on top quality card rather than all hand drawing.

My original method was to sketch on paper, get approval from the customer,  make any changes if needed,  then scanning, redrawing and then colouring  (and that was on a good day, often the pen might slip as my hands hurt, or I would draw a line a little too thick or occasionally take a pen lid off and it explode. )  If I found any problems I would redo.  Some portraits could easily take several hours just because of a tiny mistake.

As you can imagine this had to stop, or at least change!

It was a real battle with my brain and heart though.  My brain wanted to be practical and produce top quality portraits every time.  But my heart felt it wasn't truly hand made, that customers wouldn't expect something digital to be hand drawn.  What do you think?  I started to realise that it isn't always the way you make something but the results with some handmade items.  If I realistically charged for all the time a portrait took, with all the redos and customers wanting last minute changes no one could afford it! But, if I drew it digitally I could easily make these alterations, reduce my time and the pain in my hands.

I also discovered a wonderful new plan formed...... but I will tell you more about that another time or you will be sooooooo bored of such a long wordy post!

So today I thought I would show you a little look at my portrait style as it has changed over the years and how they look now.    


My first portrait.  You may notice noone has any necks!
I did love this one though and it was for a friend and never sold so don't panic any of you copyright police out there!  (that's usually me lol)

My portraits started to have tiny necks and longer legs.  


Another hand drawn portrait, this one has so much texture and that kilt!!!!  Oh my that took hours to get the pattern right!
You may notice that hand drawn portraits are much harder to photograph too, so much detail is lost in the image.

In fact it took well over a year for my characters to start getting more realistic proportions.  I've never liked the idea of drawing someone as large or thin, busty or flat.  I tend to create my portraits with a feeling of their inner child.  I do get asked to make people larger or thinner mind so I have started to do that now.


Here is a portrait  I was asked to create for a preschool!  What a great way for people to identify with the staff in the setting in a friendly way.  This portrait was digital, and just as well as there were a few alterations, people to be added and others who had changed job roles. Here it is again all festived up ready for Christmas cards!


Here are some other fantastic portraits.  These are all digital and I really love the detail and the new style.


So that's it from me until the next post!  (hopefully in less than 6 months!)

I will be sharing this post on the wonderful Handmade Monday so do pop by and check out some other amazing crafty blogs!

Jen xx

Monday 23 April 2018

Story stones... the return!

I have been working hard on my story stones recently and those of you who follow my page will see plenty of posts showcasing my new designs.

So why the revamp? Well I pretty much stopped creating my stones when I discovered it was actually illegal to remove pebbles from beaches.  I was aware there were some beaches that you couldn't do it and I avoided those I knew about but apparently it is all beaches in the UK!  Oh my, that really changed things.  I couldn't find any pebbles to buy in the UK that were exactly what I needed and I didn't want to add to the cost even more.  I needed to rethink.


This is an image of my original stones.  I used to draw and colour the illustrations onto media paper and then cut them out, glue them and then cover in varnish!  It was a very long process and only worked successfully on flat surfaces. 

I am very keen on not using materials unnecessarily and looking after the environment and of course upcycling. So I needed a rethink! 

I found some small 4cm square tiles.  Perfect!  not too costly.  So on testing they were great for manufacture but on the drop test.... OOOOPS!  smash!

Back to the drawing board again.  How can I make responsibly sourced story stones??

I had lots of wood left over from a project so thought I would have an experiment!


I created these slithers of wood, perfect size to hold and I love the texture.  Now can I get away with calling them story stones?  I did wonder about changing the word to tiles instead of stones, but you know what?  I love the way story stones sound!

So that's how the revamp started.


Here is a set of my finished tiles stones.  Each is double sided and sealed and varnished in toy grade varnish.


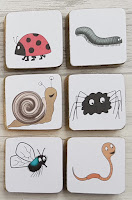
I have also created add on packs.  These contain 6 double sided tiles all in a theme.  So far these include mini beast, on the farm, fantasy, emotions and woodland.  There are lots more on their way tho!!! If you'd like to see the full range do click here 


I am also close to releasing these roll a story cubes.  These contain 5 images and one title and will be sold in sets of 6, 4 or singularly.


I also needed to revamp my logo!  So here is my new sparkly logo.  I really wanted to get over the feeling of telling a story. 


If you would like to follow my story stone journey then feel free to join my dedicated facebook page or my webpage.

I have also created a Youtube playlist showcasing all my story stones.  Do pop by and say hi. 


I can also create custom stones so if you have any particular ideas feel free to give me a shout. 

I will be sharing my post over at Handmade Monday if you fancy popping by to find some fab new blogs to read or even to take part.

Jen xx


Saturday 14 April 2018

So What Planner Is The Best For Me?


Oddly enough I get asked this question quite often and so I thought it an ideal opportunity to chat to you about the different planners and a look at the pros and cons to them all. 

So first off. How do you like to plan?  

Do you like to make lists?
Do you like everything to be ready for you to fill in?
Do you like colour or inspirational quotes?
Do you like accessories, stickers and clips?
Do you like to doodle as you think?
How do you feel about pages that look a mess?
Do you like to rearrange your planner often and move things around?
Do you like to stick with a particular format?

So these are a few basic yet important questions to ask yourself.  If you are new to planning though don't panic, you now have the exciting opportunity to find out the answers to the above questions!

SO we looked at how you plan.  Now the best sort of planner to fit the bill. Here are a selection of planner styles, all are great in their own ways and fully adaptive to your style, especially if you know someone (hint hint) who can make you a customised planner if needed.

RingBound , like a filofax, Carpe Diem etc


Ring bound planners usually have 6 rings inside that open so you can pop in whatever inserts you wish.  The idea with these planners is to customise them yourself.  You can often buy planners with diary inserts in place and a few blank pages from high street shops.  Or you can pop me a message and I can find a few to suit.
Inserts are easy enough to come by.  Places like WHSmiths, Paperchase and Amazon are all good places to look for inexpensive inserts.  (or you can ask me! lol)

Pro's
You can move your inserts around easily until you find an order you are happy with.
You can remove pages you have used or don't need easily
You can add dividers and pockets
There are lots of things you can bling your planner up with including decals for the cover.
The cover usually has handy pockets on the inside, great for storing business cards... you never know when you need to drop one of those!
You can get ringbound planners in a variety of sizes
Con's
There is only so much you can put in them.  unless you get giant rings of course.  So a day a page insert will pretty much fill it up.
To add your own inserts you will need to purchase a holepunch that can punch the correct distance

Have a look at my Carpe Diem business planner set up here


Discbound ~ Such as Happy Planners, Arc and Leverage


These planners are similar to the ring bound, you can move your pages around easily enough and remove or add inserts

Pro's
Can be used for day to day planning or memory planning (although you can get really creative!)
Lots of accessories available!  (I mean loads!  Happy Planner is American so it is harder to get some supplies but Staples sells Arc supplies)
Con's
The Americans seem to have access to the most wonderful accessories and ridiculously low prices (very envious!)  There are still nice ones here however but not as many
The holes can get a bit worn and pages can become loose if used a lot.
The planner becomes flimsy if there isn't much in it and it also becomes unrealistic if you try to cram too much in it (you can get different sized rings which help)

Here are a couple of examples or Discbound planners.  This one is of the Happy Planner which I transformed into a health planner.
This one is a business planner I created for a customer.

To have a look at some of the wonderful discbound planners and accessories I have in stock click here!

Bullet Journal


Bullet Journalling, Or BuJu, is a style of planning which can be as simple or complex as you like.  All you need is a plain notebook.  You can have it hard backed, spiral bound or even stapled.  The key thing with Bullet journalling, or rather it's primary goal was list making.  Now you will find so much inspiration regarding this method of journalling that it really is a case of the world is your oyster!

Pro's
Cheap, You only need a book and a pen.  Although it can cost a bit more if you want pretty pens and dotted paper!  (I can even custom make you a dotted hardback book, perfect for the job!)
Great if you are creative but also perfect for those who like clean lines and the simplistic look.
Really adaptable and totally yours.
Ideal for anyone who likes lists.
Con's
If you make a mistake it isn't always easy to remove a page.
Can take a lot of time o set up if you really get into it... maybe that can be a pro too!

Here is a look inside a couple of my past journals.  These were just notebooks and were a great way for me to find a system that worked for me. I will be adding a look through my latest BuJu soon.
Here is a link to my BuJu Pinterest board for a little inspiration

Travellers Notebooks - Midori, Jendori and lots more


This is possibly one of the most versatile (although I often flit between these and my bullet journals)
A Travellers Notebook or TN is a cover with elastics inside which you then fill with inserts.  You can have all sorts of inserts from a diary, celebration calendar, plain, dotted, colouring in.... Oh it is endless (and you guessed it I make these!!!!!  )
TN's can come in a variety of sizes and so it is always a good plan to check you are asking for the right size inserts when ordering.  There are lots of places to buy inserts (Or from me!!  hint hint)
I sell my own range of these called Jendori.  They are fabric covers and have either one or two folds and can come with or without internal pockets. Jendoris are made to order and I always try to match the fabric to your tastes.

Pro's
Each TN is so different
You can fully customise it with charms and accesssories
You can have just the inserts you need
Unique to you
Con's
Few Brick and Mortar shops sell inserts or accesssories (although this is changing slowly)
It can become really addictive!
If you like perfect it may be too irregular for you, things can often stick out all over the place depending on your style.

Click here to have a look through some of my Jendories and get an idea of how adaptable they are!

Well congratulations if you reached the end,  Extra brownie points if you watched the links too!  I do Hope I have helped a little in your quest for the ideal planner.  I still juggle between a few if I'm honest, I love them all for totally different reasons which makes it so much harder to choose just one.... so I don't!

So if you fancy a new planner or want to browse my shop I have lots of ready to post items reduced at the moment! www.jennysis.uk

As I often make all these planners I thought I would share this post over at Handmade Monday.  Do pop by if you have created anything recently and join in. xx

Jen xx

Monday 15 January 2018

Making a modelling clay figure

Before Christmas I spent some time revamping a character in a book I wrote a few years back.  It occurred to me that to help me with the drawing it would be good if I could have a model to work from.  I always struggle with profiles and obscure angles of the head. 
Now my modelling skills do have a lot to be desired, I do like to give these things a go however, so here is my little tutorial for making a 3d figure.


So I'd like you to meet Pigley!  A cute toddler who is discovering new and exciting things about her world.

So how to start creating her???  Well first off I got some wire and bent it into a vaguely stick figure shape.  (really thought I had a pic of this ageist but apparently not.)  for the head I just made a loop shape.  Make sure your arms and legs are the same length as each other and that each end has a loop of metal. You can see the feet in this image are just loops.
Now get out the foil!  I found the heap foil I had was a bit useless... Actually it was very useless all round.  But I had some proper stuff and this worked far better.  You want to compactly wrap the wire structure to flesh out the bones as it were. 


Here you can see my little person now looks more person than stick!  Why bother?? Well if I made the head completely out of clay it would 1, be very very heavy and 2, very expensive!  This way you don't waste materials.

Next step was to get some flesh coloured clay and create the head shape. Because you make a loop in the wire at the beginning you will find the head should twist around or fall off!

Now bake you clay for about 15 minutes.  This is something I hadn't thought to do before but it made a huge difference.  The key thing to remember is to make sure you have all the facial features you want.  You don't even need to add hair.  If you wish to you could also add flesh to the hands and feet or anything else that will be exposed.


Once baked I allowed to cool and then started work on the rest of her, adding clothes and hair.  I also added a stand so she wouldn't fall over.


Lastly, into the oven she goes (I felt like the wicked witch then lol)
Baked on 130 for 25 minutes (from a cold oven)  In future I would pop a mug behind as she did tumble back at one point and the back of her hair caught slightly.


And here she is all finished.  There is lots I'm not that happy about but I still love her.  My first partially successful attempt at modelling a figure.


Why not have a go yourself!  I'd love to see what you create!

I am popping by Handmade Monday again, so why not pop by and say hi!

Jen xx

Sunday 7 January 2018

Personlised colouring books

Last year I had an idea! (March to be exact)  Well I had a few but time really didn't help on getting many done! Well my idea was to create personlised colouring sheets which would combine my portraits and my illustrations.  So over the rest of the year I created a variety of different images, each containing a child.  The children on the pages were headless!  I'm sorry, yes that sound a bit brutal! But it was a necessity!


So why headless?  Well I needed to be able to draw the heads on seperatly so that all the children in the colouring book would be the same child!  (hence the personlised bit!)


So I can now create colouring books where the child is the focus of every picture, they are exploring and enjoying all sorts of environments from deep sea diving to  riding giraffes.

I really have had lots of fun with this project and I can now offer these colouring books for £20.
Fancy a look in one I was commissioned to complete for Christmas?  This one only has 16 images and also has 20 plain sheets at the back.


If the video doesn't work here is the link.

Here are a few other images.


If you want to order one of these books then please pop me a message.  I havn't got these live on my site yet.


Well I will be popping by Handmade Monday to see what other crafty bloggers have been up to, I do hope you will pop by and have a look too!

Jen xx


Friday 5 January 2018

Parenting the crafty way #6

Well Hello there.  I don't know about you but sometimes children totally confound me.  I have worked with children for over 10 years before I stopped to extend my family.  I have had the pleasure to work with children from 2 to 18 and what have I found?  They are all totally different.

Now I thought all that practise would make parenting a doddle!  In fact my eldest was pretty easy going on the whole, and she has so far survived to see 16, not taken drugs, had a boyfriend or become a smoking obsessed alcoholic!  YAY!  (huge win)  So when it came to child number 2 I thought, 'hey man, I totally got this!'
OMG how wrong was I!

Well on the plus side not only has number 2 reached 5 years old and started school in one piece but we also went on to have a number 3!

Now I don't want to go into too many details, but to say that the last few years with number 2 has been very difficult for me is a little bit of an understatment.  I've had to deal with impressive tantrums and child who is so stubborn she will deny herself things she is desperate for just so she can be in charge or right!

As parents it is so easy to blame yourself for being a bad parent, that we did something wrong.  This isn't true!  At least I know this isn't true but I find I blame myself for so much.  We have been on a few different courses and spoken to several professionals to help us be the best we can, but still things have been a bit off.

All my other crafty parenting posts have been as a result of these courses.  I had been trying to create environments for my young ones that promotes praise and pride in their achievements as well as a way to express emotions and explore their world.  Now generally these things have been positive and we still utalise a few, especially the wow wall (although this has had a make over, so more about that another time!)

Today though I felt I really had to share my latest idea.  I realised earlier this week that when little 2 has a tantrum and hits out she really isn't happy about it, in fact she is in such torment with her emotions that a tantrum is exhausting and traumatic for her.  I've tried many different systems and theories to help her but nothing really seems to work.  So thinking cap on, this is what I did!

The calm spot

Yesterday I bought lots of exciting goodies which I popped in a new bag.  The bag contained items I felt might help her feel calm, safe and distract her.  There was a squeezy  ball, a fidget spinner and a fidget ring, a bendy snake thing, a mirror (not glass) and a really soft owl.  I didn't get anything that was either easy to break or would cause damage if thrown)


I introduced the bag to her by taking her to a little corner in my wardrobe and telling her that when we send her to time out it isn't because we are cross with her but to help her calm down.  I followed by telling her that I could see how upsetting her being cross was for her and thought maybe, instead of a time out she could have a clam down place, somewhere special for her to hide and calm herself down.

So, keen on this idea she helped me decorate the space and get it all ready.  She has cushions and a blanket to lie on, fairy lights on the ceiling and we hung the mirror up so she can see her face and check if she looks calm or not.


I also thought I would get her some ear muffs as sound sometimes bothers her as well as something to blow.  I wondered about the traditional whoopy cushions but they are full of foam now and self inflate!  (why?  well taking deep breaths is a good way to try to calm down and I thought by inflating a whoopy cushion she would need deep breaths and then there is a payoff of sitting on it and making a funny noise!)

Well so far she has been to her calm spot twice and I have to say she has enjoyed her space.  Fingers crossed it helps her.  Will keep you up to date!

Do you have any tantrum related good tips?

Next post will be something crafty but really wanted to share this with you.  If you got to the end congratulations... sorry it was a bit wordier than usual!

Jen xx